Release Notes
Getting started
DE-CIX Access
Overview and technical specifications
Create a new Access or LAG
Monitor your Access
Delete your Access
GlobePEER
Overview GlobePEER
Create your GlobePEER service
Manage your GlobePEER service
Delete your GlobePEER service
Blackholing Services
Route Service
Route Server Guides
DE-CIX ASEAN GlobePEER Route Server Guide
DE-CIX Barcelona GlobePEER Route Server Guide
DE-CIX Chicago GlobePEER Route Server Guide
DE-CIX Copenhagen GlobePEER Route Server Guide
DE-CIX Dallas GlobePEER Route Server Guide
DE-CIX Dusseldorf GlobePEER Route Server Guide
DE-CIX Esbjerg GlobePEER Route Server Guide
DE-CIX Frankfurt GlobePEER Route Server Guide
DE-CIX Hamburg GlobePEER Route Server Guide
DE-CIX Helsinki GlobePEER Route Server Guide
DE-CIX Houston GlobePEER Route Server Guide
DE-CIX Istanbul GlobePEER Route Server Guide
DE-CIX Jakarta GlobePEER Route Server Guide
DE-CIX Kristiansand GlobePEER Route Server Guide
DE-CIX Kuala Lumpur GlobePEER Route Server Guide
DE-CIX Leipzig GlobePEER Route Server Guide
DE-CIX Lisbon GlobePEER Route Server Guide
DE-CIX Madrid GlobePEER Route Server Guide
DE-CIX Malaysia GlobePEER Route Server Guide
DE-CIX Marseille GlobePEER Route Server Guide
DE-CIX Mexico GlobePEER Route Server Guide
DE-CIX Munich GlobePEER Route Server Guide
DE-CIX New York GlobePEER Route Server Guide
DE-CIX Oslo GlobePEER Route Server Guide
DE-CIX Palermo GlobePEER Route Server Guide
DE-CIX Phoenix GlobePEER Route Server Guide
DE-CIX Richmond GlobePEER Route Server Guide
DE-CIX Rio De Janeiro GlobePEER Route Server Guide
DE-CIX Sao Paulo GlobePEER Route Server Guide
ACIX GlobePEER Route Server Guide
AF-CIX GlobePEER Route Server Guide
AqabaIX GlobePEER Route Server Guide
Borneo-IX GlobePEER Route Server Guide
Doha IX Route Server Guide
IRAQ-IXP Route Server Guide
Penang IX Route Server Guide
PIE Karachi GlobePEER Route Server Guide
Ruhr-CIX GlobePEER Route Server Guide
SEECIX GlobePEER Route Server Guide
UAE-IX GlobePEER Route Server Guide
SH-IX Dubai Route Server Guide
SH-IX Fujairah Route Server Guide
Action BGP Communities (Route Server Control)
DE-CIX GlobePEER Route Server Action BGP Communities
ACIX GlobePEER Route Server Action BGP Communities
AF-CIX GlobePEER Route Server Action BGP Communities
AqabaIX GlobePEER Route Server Action BGP Communities
Borneo-IX GlobePEER Route Server Action BGP Communities
IRAQ-IXP Route Server Action BGP Communities
PIE Karachi GlobePEER Route Server Action BGP Communities
Ruhr-CIX GlobePEER Route Server Action BGP Communities
SEECIX GlobePEER Route Server Action BGP Communities
UAE-IX GlobePEER Route Server Action BGP Communities
Doha IX Route Server Action BGP Communities
SH-IX Fujairah Route Server Action BGP Communities
SH-IX Dubai Route Server Action BGP Communities
Informational BGP Communities (Route Details)
DE-CIX GlobePEER Route Server Informational BGP Communities
ACIX GlobePEER Route Server Informational BGP Communities
AF-CIX GlobePEER Route Server Informational BGP Communities
AqabaIX GlobePEEER Route Server Informational BGP Communities
Borneo-IX GlobePEER Route Server Informational BGP Communities
IRAQ-IXP Route Server Informational BGP Communities
PIE Karachi GlobePEER Route Server Informational BGP Communities
Ruhr-CIX GlobePEER Route Server Informational BGP Communities
SEECIX GlobePEER Route Server Informational BGP Communities
UAE-IX GlobePEER Route Server Informational BGP Communities
SH-IX Dubai Route Server Informational BGP Communities
SH-IX Fujairah Route Server Informational BGP Communities
Doha IX Route Server Informational BGP Communities
Looking Glass Guides
DE-CIX GlobePEER Looking Glass Guide
ACIX GlobePEER Looking Glass Guide
AF-CIX GlobePEER Looking Glass Guide
AqabaIX GlobePEER Looking Glass Guide
Borneo-IX GlobePEER Looking Glass Guide
IRAQ-IXP Looking Glass Guide
PIE Karachi Looking Glass Guide
Ruhr-CIX GlobePEER Looking Glass Guide
SEECIX GlobePEER Looking Glass Guide
UAE-IX GlobePEER Looking Glass Guide
SH-IX Dubai Looking Glass Guide
SH-IX Fujairah Looking Glass Guide
Doha IX Looking Glass Guide
Notes on additional Routes (incl. Google VPP) via GlobePEER Route Service
Closed User Groups
DirectCLOUD
Overview and Monitoring
Cloud Connections
DirectCLOUD for Microsoft Azure
Create DirectCLOUD Connection for Azure
How to order a DirectCLOUD connection for Azure
Create or upgrade Gateways for your Azure ExpressRoute
Manage your Azure Cloud Connection
Upgrade / downgrade a DirectCLOUD service for Azure
Change DirectCLOUD configurations for Azure
Delete DirectCLOUD configurations for Azure
Monitoring Azure ExpressRoute uptime
Monitor your connection
Updating the Cloud Key for Your Azure DirectCLOUD Service
Delete your Azure Cloud connection
FAQ DirectCLOUD for Microsoft Azure
DirectCLOUD for AWS
Create DirectCLOUD connection for AWS
Manage your DirectCLOUD connection for AWS
Upgrade / downgrade the connection
Change DirectCLOUD configurations for AWS
Delete DirectCLOUD configurations for AWS
Monitoring AWS DirectConnect uptime
Monitor your connection
Delete your AWS Cloud connection
DirectCLOUD for IBM
Create DirectCLOUD connection for IBM
Manage your DirectCLOUD connection for IBM
Upgrade / downgrade a DirectCLOUD service for IBM
Change DirectCLOUD configurations for IBM
Delete DirectCLOUD configurations for IBM
Monitor your connection
Delete your IBM Cloud connection
DirectCLOUD for GCloud
Create DirectCLOUD connection for GCloud
Manage your DirectCLOUD connection for GCloud
Upgrade / downgrade the connection
Change DirectCLOUD configurations for GCloud
Delete DirectCLOUD configurations for GCloud
Monitor your connection
Delete your GCloud connection
DirectCLOUD for Oracle
Cloud ROUTER
Overview & use cases
Create / Manage your Cloud ROUTER
Create / Manage the configurations
Add a configuration
Upgrade / downgrade a configuration
Change your Cloud ROUTER configurations
Monitor your configurations
Delete a Cloud ROUTER configuration
Advanced Settings Cloud ROUTER
VirtualPNI
Overview VirtualPNI
Create your VirtualPNI
Order and configure your VirtualPNI between your own resources
Order and configure your VirtualPNI to a third-party provider
Manage your VirtualPNI
Upgrade / Downgrade your VirtualPNI service
Change VirtualPNI configurations
Delete VirtualPNI configurations
Monitor your VirtualPNI
Delete your VirtualPNI service
Colocation
Out-of-band access to your DE-CIX colocated equipment
Shipping Information
Colocation equipment management for Digital Realty data centers
DE-CIX API
Overview DE-CIX API
Quick API Reference
Cloud ROUTER Postman Collection
Monitor and Visibility of Learned Routes and Advertised Routes by API
BGP Ingress and Egress Filters Usage by API
Terraform Provider
Terraform Provider Overview
Getting Started
Provider Configuration
Managing Services
State Management
End-to-End Example
Virtual PNI with a Foreign Port (Terraform)
Service Insights System
Service Insights System - Tutorial
Standard customer Service Insights Tutorial (for customers without reselling services or DaaS location)
Service Telemetry Insights Tutorial
GlobePEER Traffic Insights Tutorial
GlobePEER Threat Insights Tutorial
Cloud ROUTER Traffic Insights Tutorial
Reseller Service Insights Tutorial
Reseller GlobePEER Traffic Insights Tutorial
Reseller GlobePEER Threat Insights Tutorial
Reseller Service Telemetry Insights Tutorial
Partner (DaaS) Service Insights Tutorial
Partner GlobePEER Traffic Insights Tutorial
Partner Service Telemetry Insights Tutorial
Partner GlobePEER Threat Insights Tutorial
Service Insights Tutorial - General Informations
Service Insights System
Account administration
Add new users or subcustomers
Manage user roles and permissions
Multi-Factor-Authentification
Retrieving username and reset password
Delete a user
Customer service and ticket system
Table of Contents
- All Categories
- VirtualPNI
- Create your VirtualPNI
- Order and configure your VirtualPNI to a third-party provider
Order and configure your VirtualPNI to a third-party provider

What this covers
Use this guide when you want to connect your network to another company — for example a partner, customer, or supplier — instead of connecting two of your own Access ports.
Your side of the connection is the A-Side; the other company's side is the B-Side. You order the service and configure your own side; the other company configures theirs. The VirtualPNI goes live once both sides are configured.
Connections to a third-party provider are currently always Access ↔ Access. Support for Access ↔ Cloud ROUTER connections to a third-party provider is coming soon.
A company can mark one of its Access ports as discoverable. A discoverable port is shown in the DE-CIX portal, so that other customers can find it and request a VirtualPNI to it — you select the company and the port from a list instead of having to obtain their port details first.
What this does — and does not — mean:
• The connectivity is delivered entirely over the DE-CIX platform. There are no cross-connects to order and no physical coordination between the two sites — we provision the connection between the two Access ports for you.
• The other company still has to configure their side. Selecting their port lets you place the order; it does not configure their end. They must add their own technical configuration (Access port, encapsulation and VLAN) before the service goes live.
• You may still need to talk to each other. Discoverability makes finding the port and ordering the connection self-service — it does not replace agreeing on the connection itself, such as commercial terms or the VLAN and IP addressing you want to run over it.
Both endpoints on your own account? See Order and configure your VirtualPNI between your own resources.
The portal only lists ports that have been explicitly made discoverable. A network can be connected to DE-CIX and still not appear here — if you know your partner is on our platform, ask them to make one of their ports discoverable.
Looking for potential partners? The Connected Networks list on the DE-CIX locations page shows every network present at each location.
Prerequisites
- One Access for your A-Side (see also Create a new Access).
- The company you want to connect to has made one of their Access ports discoverable.
This is not yet supported in the portal. Please get in touch with our customer service — we will set it up for you.
Steps
- Login to our portal and click on Add Services either on the dashboard or the Service overview page.
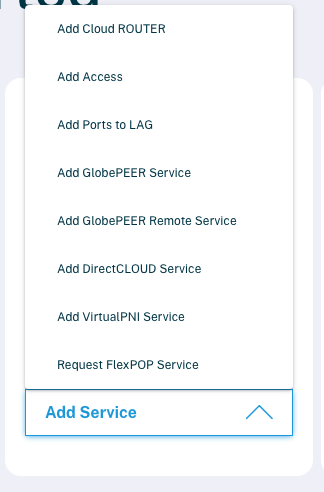
- Select Add VirtualPNI Service.
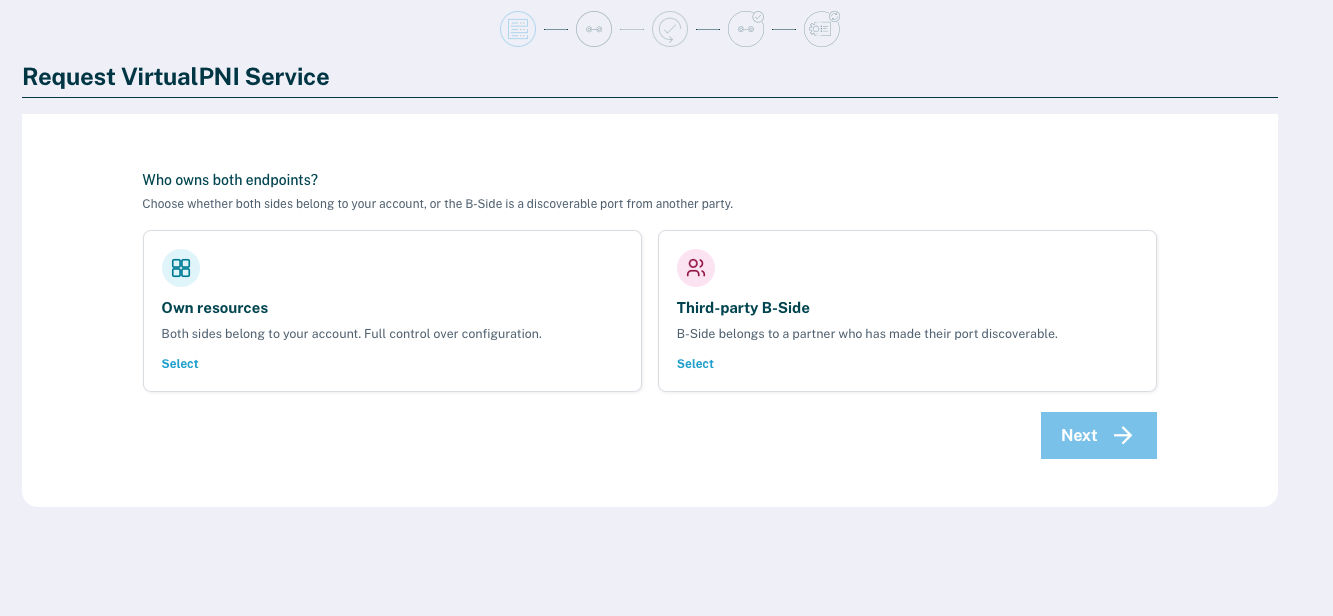
- On Who owns both endpoints?, select Third-party B-Side and click Next.
- Search for and select the partner account.
- From that provider, select a discoverable port — each is shown with its metro area and data center.
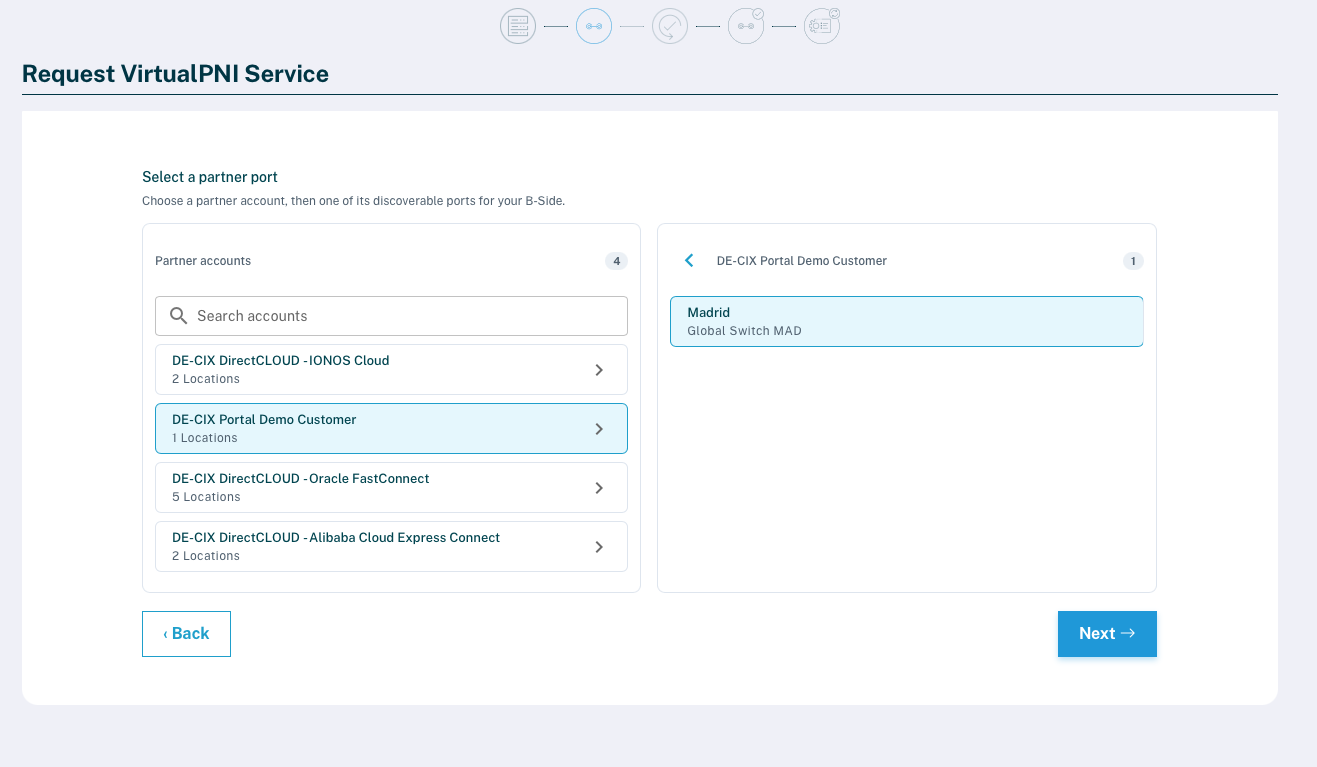
- Click Next.
- On the configuration screen, the following information is required:
- B-Side Location: Already pre-filled and locked to the partner's port (shown with a lock icon and a note naming the partner).
- A-Side Location: Choose the metro area for your side.
- Service name: A name to recognise this service by.
- Purchase order: Your optional internal Purchase Order reference.
- Bandwidth: Drag the slider (10 Mbit/s up to 10 Gbit/s).
- Contract duration: Pick a term; the price updates to match your selection.
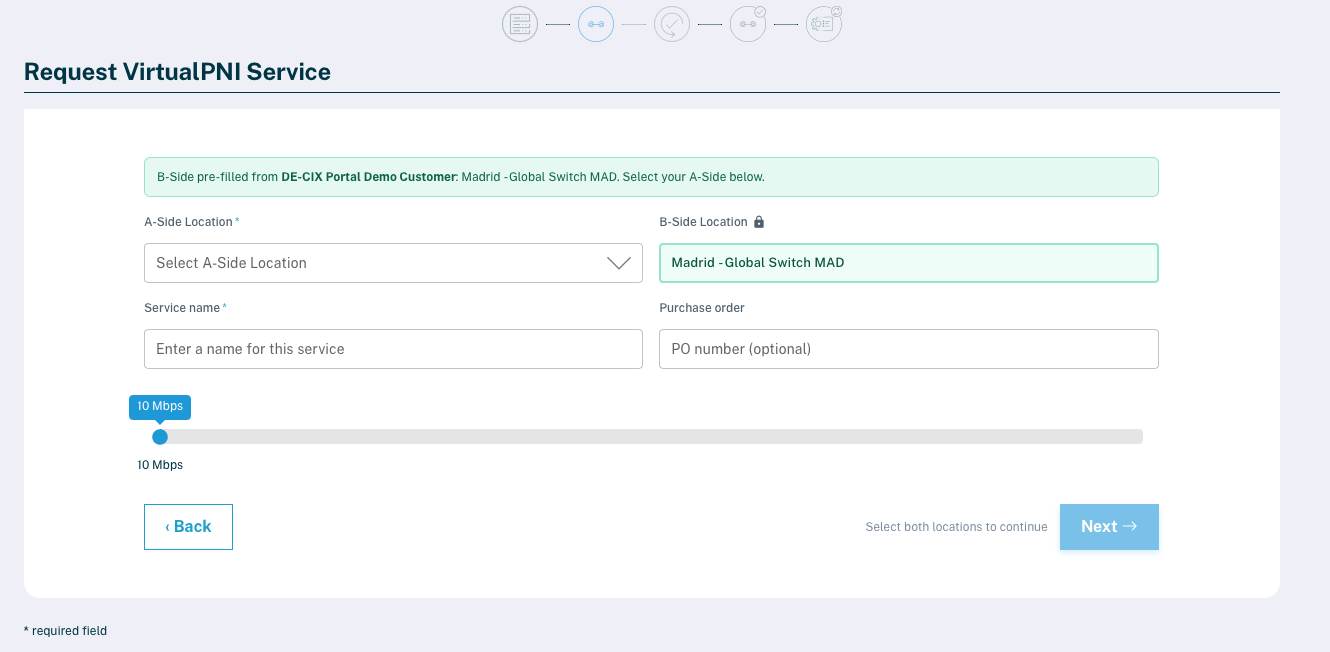
- Click Next.
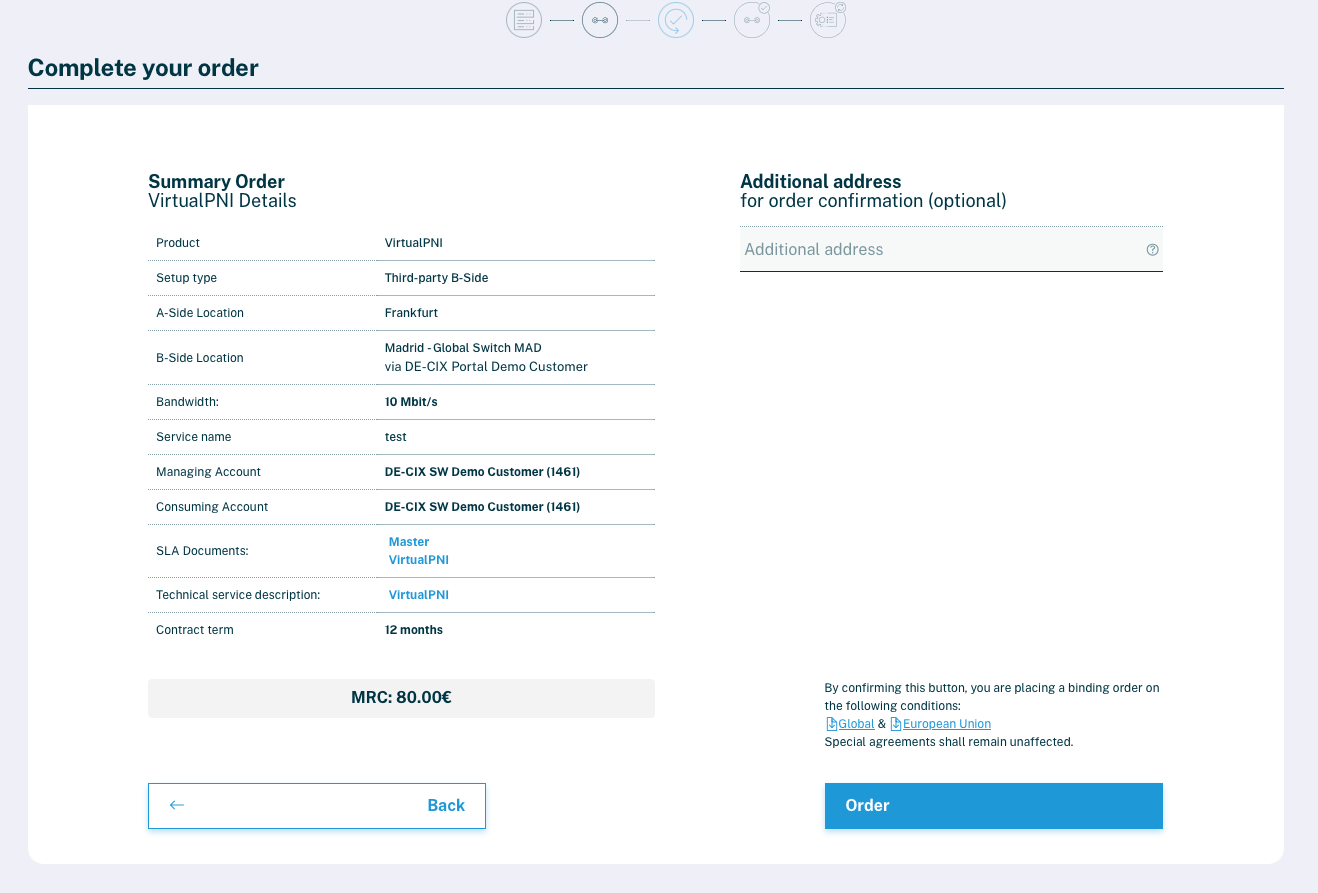
- Review the order summary, optionally add a confirmation email address, and place the order.
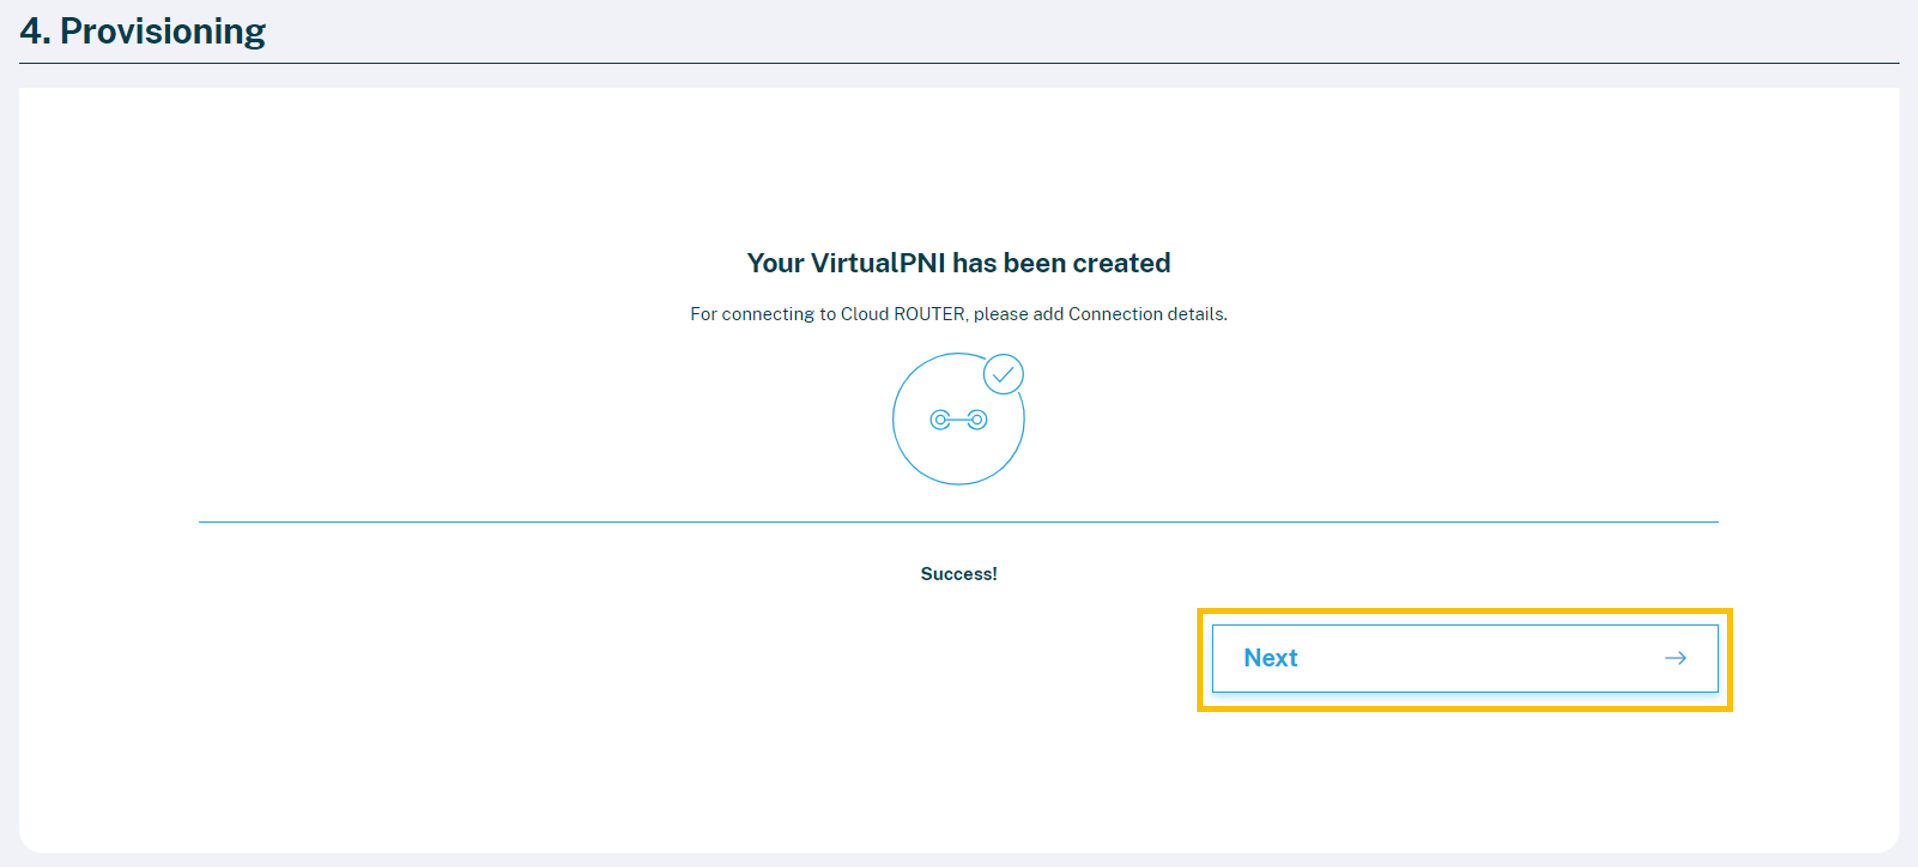
- The portal provisions the service and shows progress. When it finishes you'll see "Your VirtualPNI has been created". Click on Next.
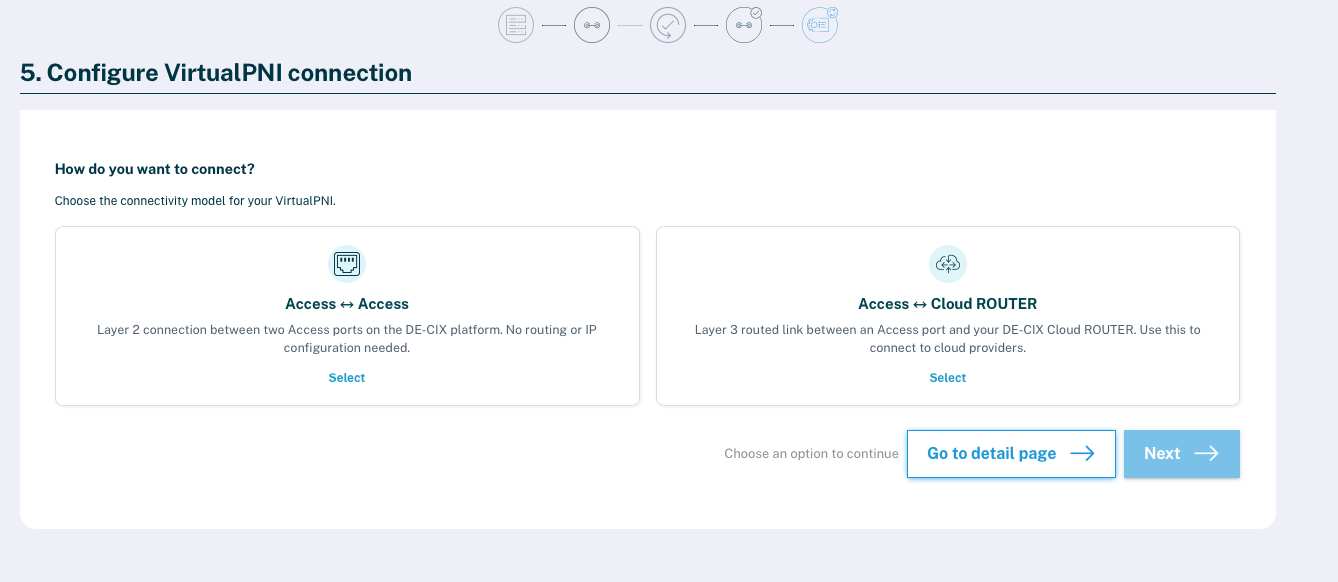
- On "How do you want to connect?", select Access ↔ Access and click Next. Continue with the steps below.
Access ↔ Cloud ROUTER is not yet available for third-party connections.
Configuring an Access ↔ Cloud ROUTER connection to a third-party provider is not yet supported in the portal — support for this is coming soon. For now, connections to a third-party provider are always Access ↔ Access.
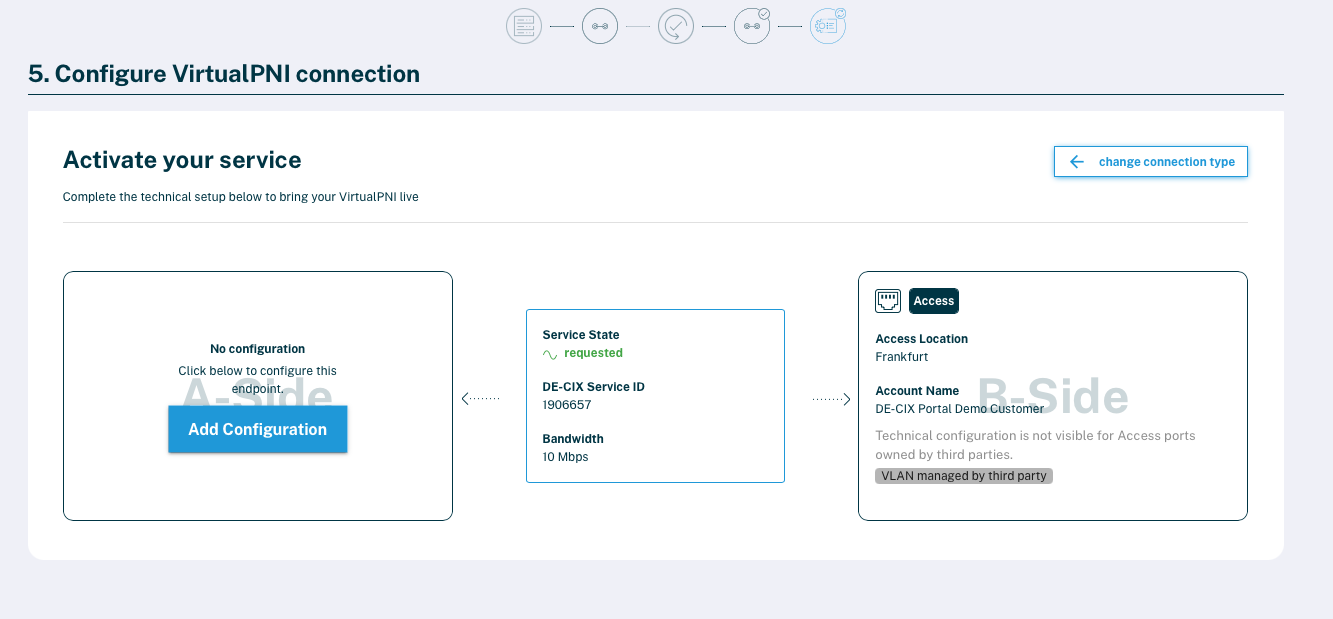
Configure an Access ↔ Access connection as A-Side
You configure only your own side — the B-Side is managed by the partner. For your A-Side:
- Select the Access Port. The list only shows ports in that side's metro area.
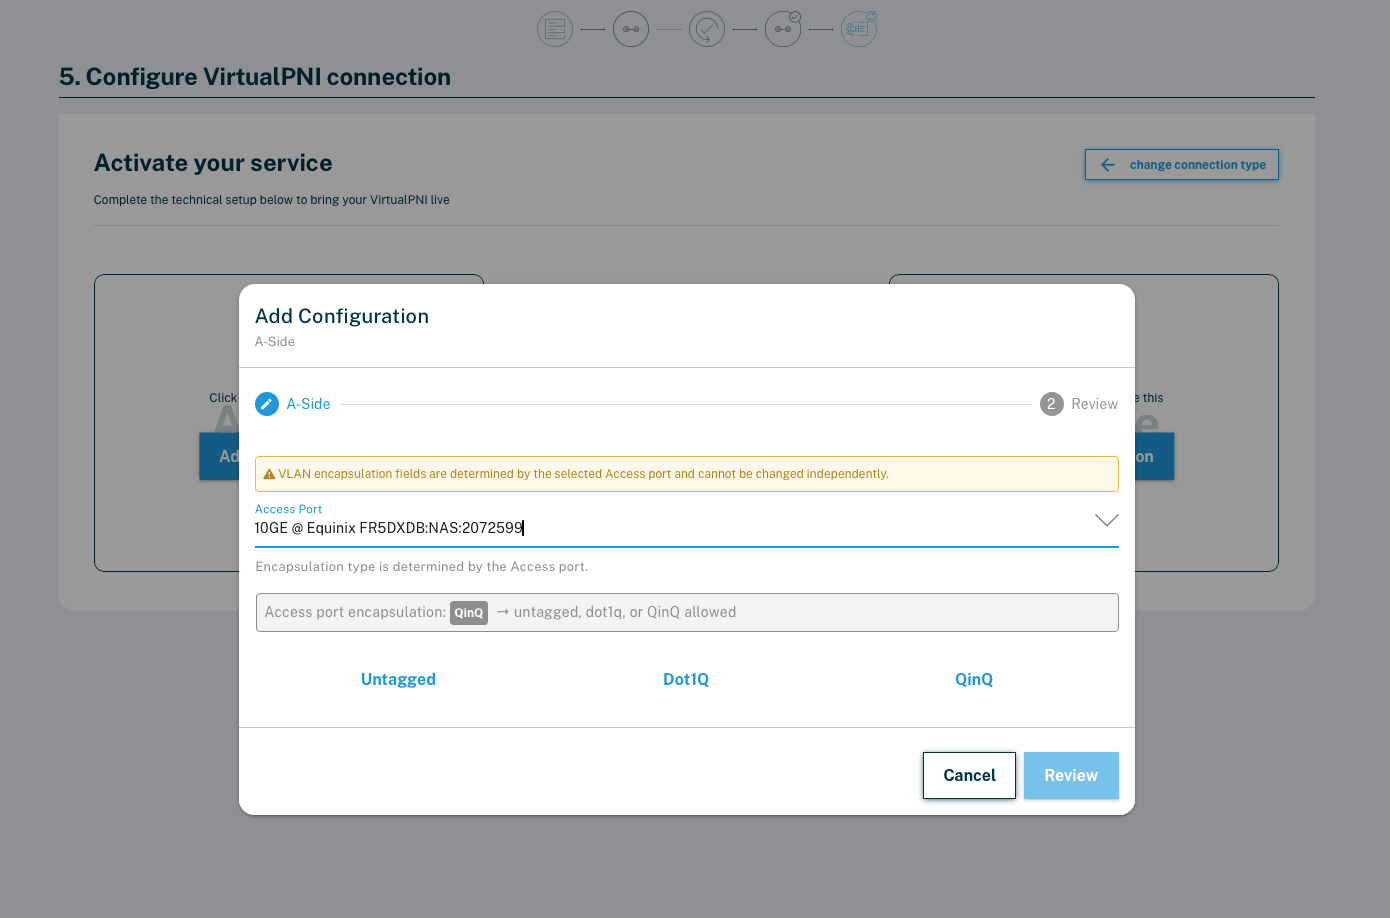
- Set the encapsulation. It's determined by the Access port you choose:
- A Dot1Q configured port uses Dot1Q and Untagged automatically.
- A QinQ configured port lets you choose Dot1Q, QinQ or Untagged.
- Enter the VLAN:
- Dot1Q: A single VLAN ID (1–4094).
- QinQ: An Inner VLAN ID (C-Tag) and an Outer VLAN ID (S-Tag), each 1–4094.
- Click Review, check the details, and confirm.
Accept a third party connection as third party provider (B-Side)
A third-party connection only goes live once the partner accepts it by configuring their side. There is no separate accept or decline button — acceptance happens through configuration:
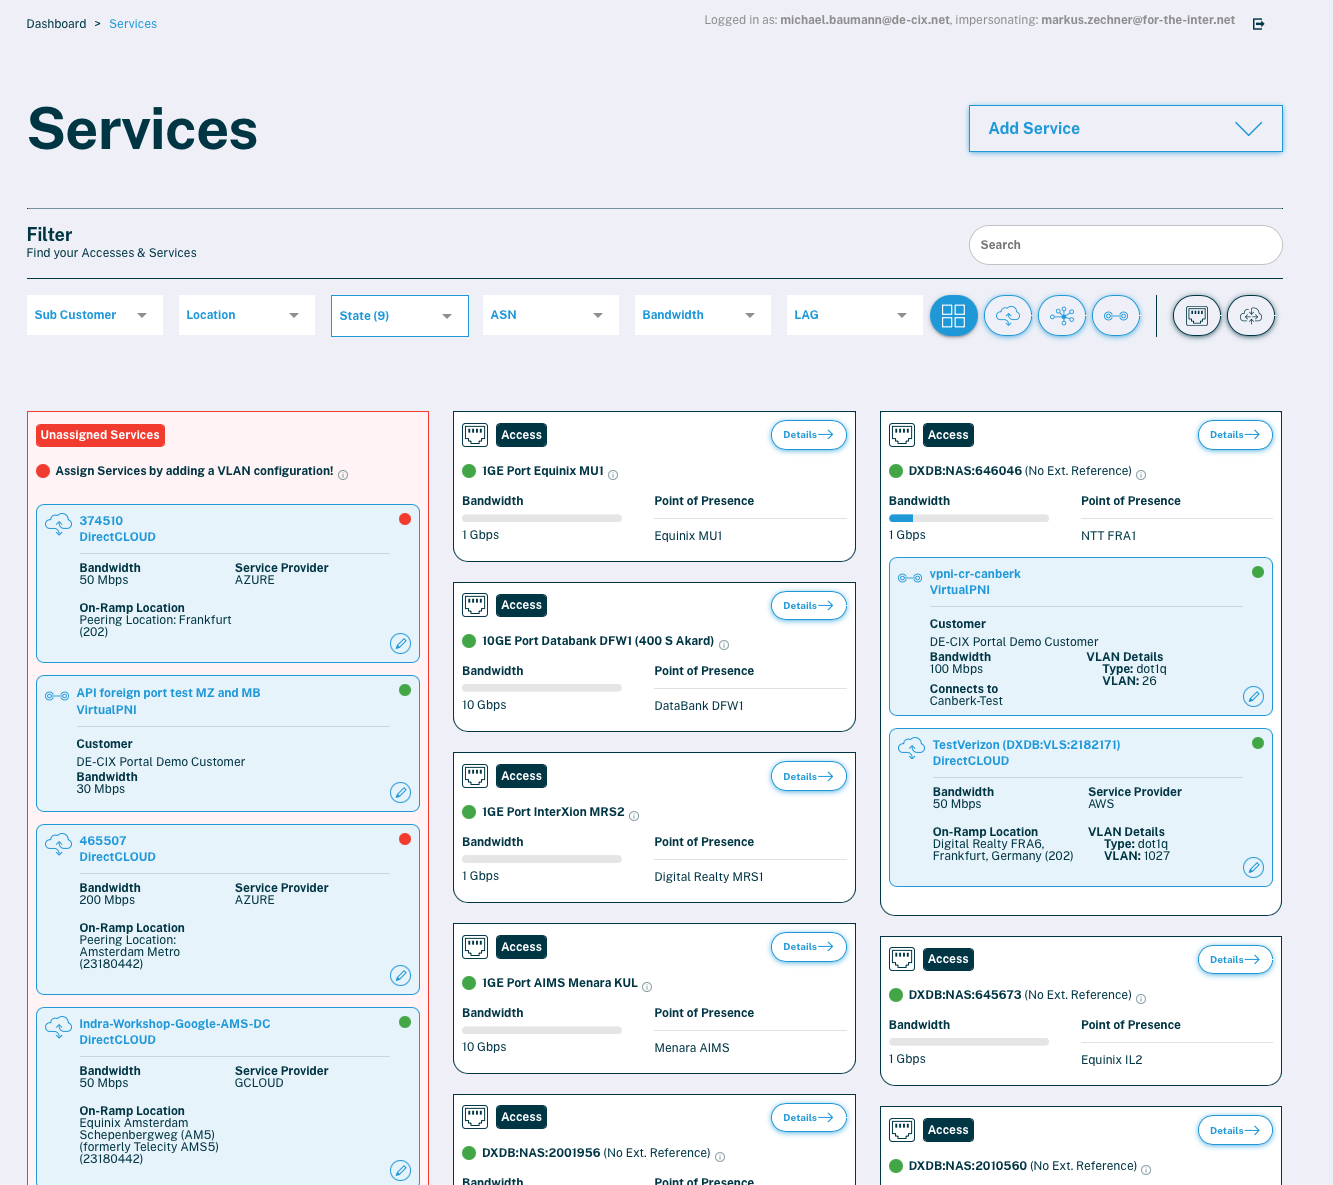
- Once the requesting party (A-Side) has placed the order, the VirtualPNI appears in the portal as an unassigned service on the Services overview page. Click the unassigned service to open its modal, then click Edit to go to the service detail page.
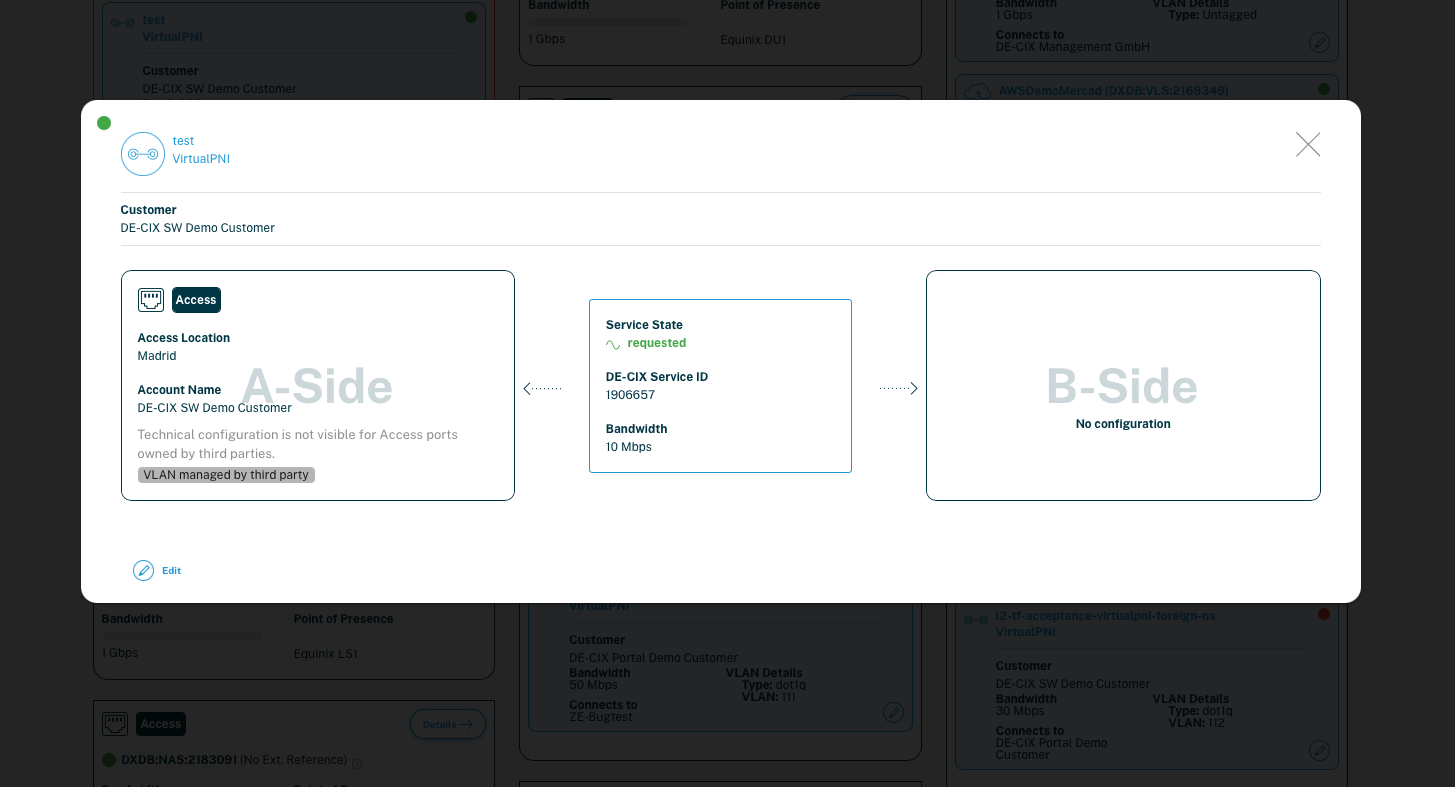
- On the service detail page, the B-Side shows No configuration. Click Add Configuration to open the configuration modal, then select your Access Port, set the encapsulation, enter the VLAN, and click Review to confirm.
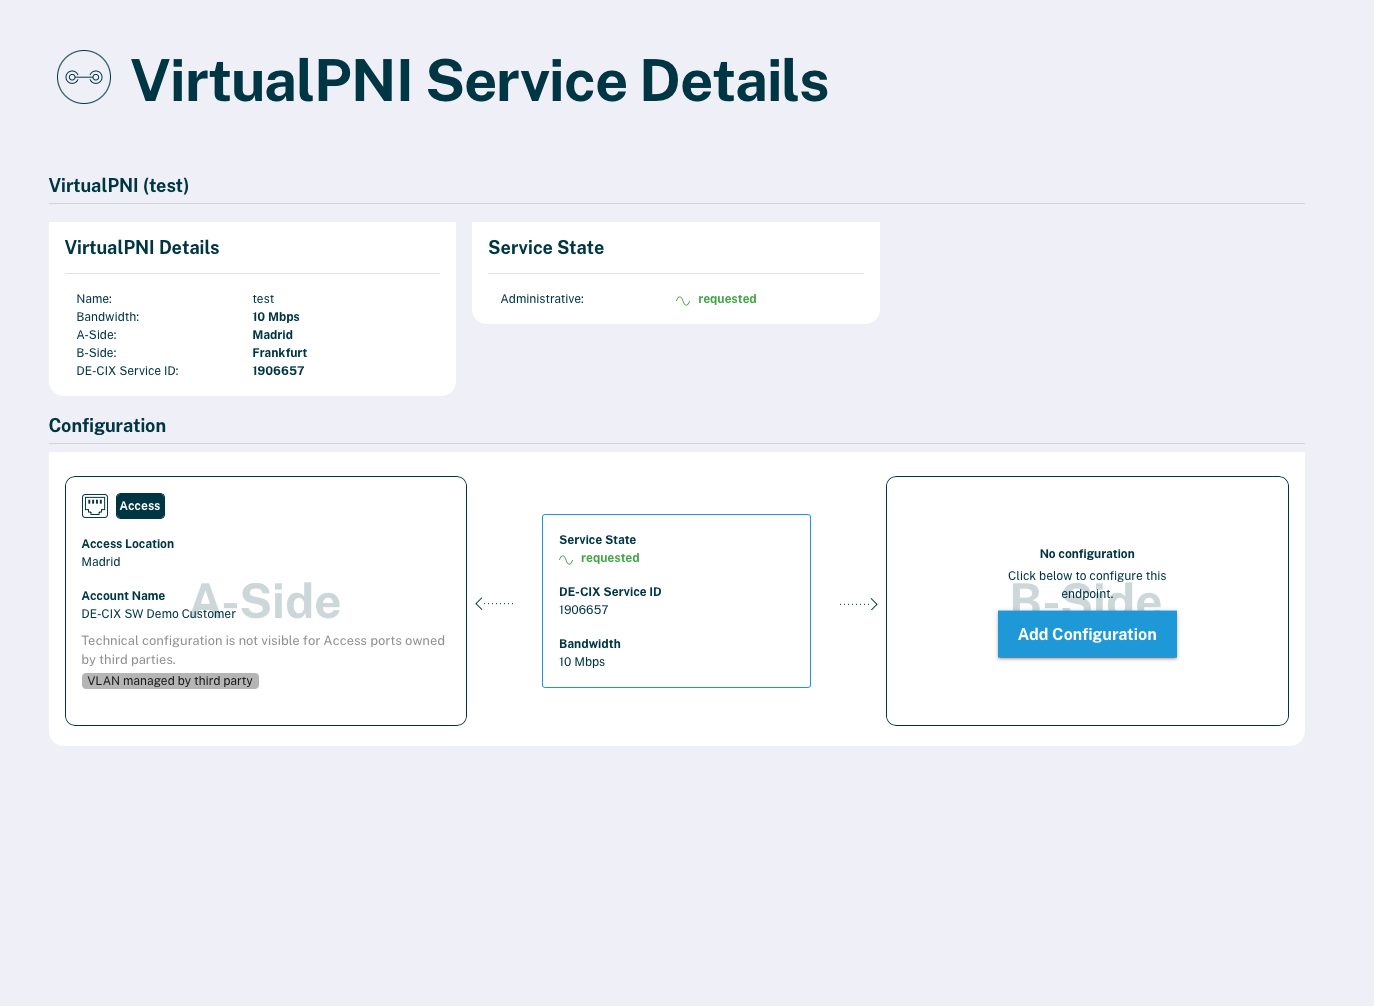
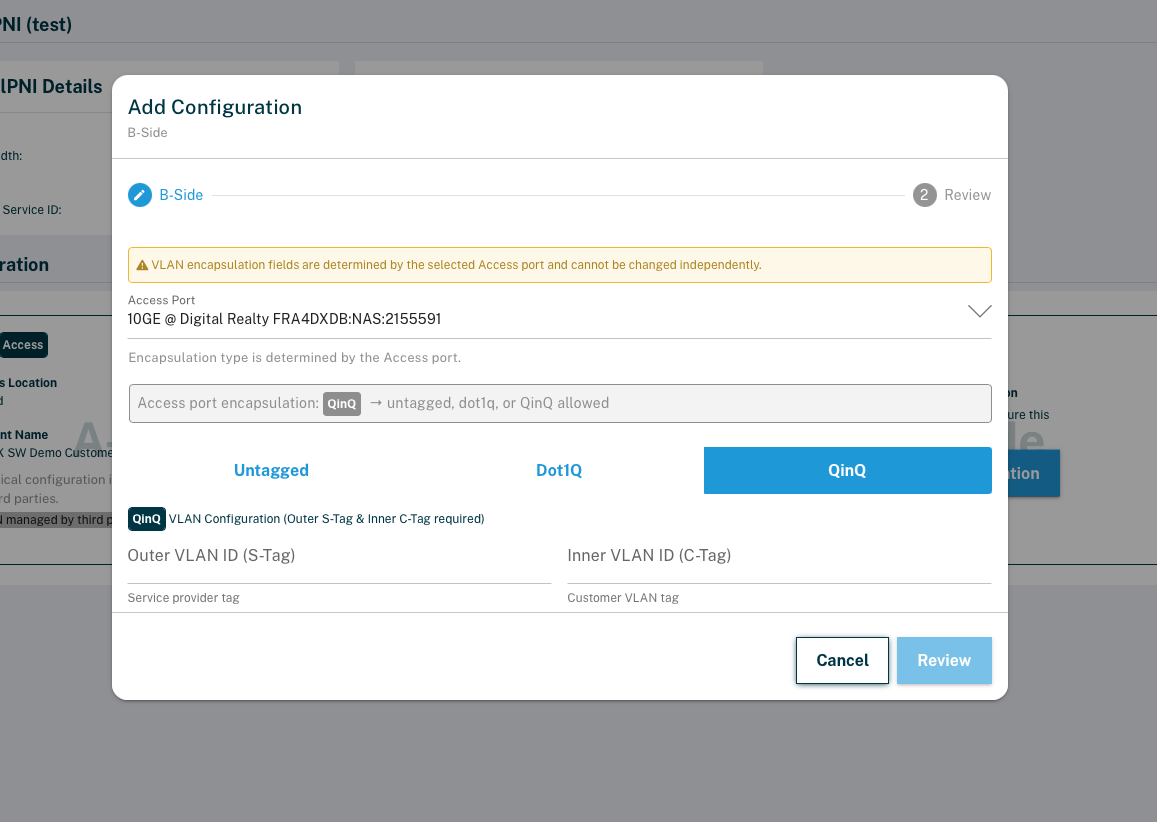
- Once you submit your B-Side configuration, both sides are configured and the VirtualPNI becomes active. Until then, the A-Side sees the B-Side as awaiting, and the service stays incomplete.
Need help? Get in touch with our customer service.
