Release Notes
Getting started
DE-CIX Access
Overview and technical specifications
Create a new Access or LAG
Monitor your Access
Delete your Access
GlobePEER
Overview GlobePEER
Create your GlobePEER service
Manage your GlobePEER service
Delete your GlobePEER service
Blackholing Services
Route Service
Route Server Guides
DE-CIX ASEAN GlobePEER Route Server Guide
DE-CIX Barcelona GlobePEER Route Server Guide
DE-CIX Chicago GlobePEER Route Server Guide
DE-CIX Copenhagen GlobePEER Route Server Guide
DE-CIX Dallas GlobePEER Route Server Guide
DE-CIX Dusseldorf GlobePEER Route Server Guide
DE-CIX Esbjerg GlobePEER Route Server Guide
DE-CIX Frankfurt GlobePEER Route Server Guide
DE-CIX Hamburg GlobePEER Route Server Guide
DE-CIX Helsinki GlobePEER Route Server Guide
DE-CIX Houston GlobePEER Route Server Guide
DE-CIX Istanbul GlobePEER Route Server Guide
DE-CIX Jakarta GlobePEER Route Server Guide
DE-CIX Kristiansand GlobePEER Route Server Guide
DE-CIX Kuala Lumpur GlobePEER Route Server Guide
DE-CIX Leipzig GlobePEER Route Server Guide
DE-CIX Lisbon GlobePEER Route Server Guide
DE-CIX Madrid GlobePEER Route Server Guide
DE-CIX Malaysia GlobePEER Route Server Guide
DE-CIX Marseille GlobePEER Route Server Guide
DE-CIX Mexico GlobePEER Route Server Guide
DE-CIX Munich GlobePEER Route Server Guide
DE-CIX New York GlobePEER Route Server Guide
DE-CIX Oslo GlobePEER Route Server Guide
DE-CIX Palermo GlobePEER Route Server Guide
DE-CIX Phoenix GlobePEER Route Server Guide
DE-CIX Richmond GlobePEER Route Server Guide
DE-CIX Rio De Janeiro GlobePEER Route Server Guide
DE-CIX Sao Paulo GlobePEER Route Server Guide
ACIX GlobePEER Route Server Guide
AF-CIX GlobePEER Route Server Guide
AqabaIX GlobePEER Route Server Guide
Borneo-IX GlobePEER Route Server Guide
Doha IX Route Server Guide
IRAQ-IXP Route Server Guide
Penang IX Route Server Guide
PIE Karachi GlobePEER Route Server Guide
Ruhr-CIX GlobePEER Route Server Guide
SEECIX GlobePEER Route Server Guide
UAE-IX GlobePEER Route Server Guide
Action BGP Communities (Route Server Control)
DE-CIX GlobePEER Route Server Action BGP Communities
ACIX GlobePEER Route Server Action BGP Communities
AF-CIX GlobePEER Route Server Action BGP Communities
AqabaIX GlobePEER Route Server Action BGP Communities
Borneo-IX GlobePEER Route Server Action BGP Communities
IRAQ-IXP Route Server Action BGP Communities
PIE Karachi GlobePEER Route Server Action BGP Communities
Ruhr-CIX GlobePEER Route Server Action BGP Communities
SEECIX GlobePEER Route Server Action BGP Communities
UAE-IX GlobePEER Route Server Action BGP Communities
Doha IX Route Server Action BGP Communities
Informational BGP Communities (Route Details)
DE-CIX GlobePEER Route Server Informational BGP Communities
ACIX GlobePEER Route Server Informational BGP Communities
AF-CIX GlobePEER Route Server Informational BGP Communities
AqabaIX GlobePEEER Route Server Informational BGP Communities
Borneo-IX GlobePEER Route Server Informational BGP Communities
IRAQ-IXP Route Server Informational BGP Communities
PIE Karachi GlobePEER Route Server Informational BGP Communities
Ruhr-CIX GlobePEER Route Server Informational BGP Communities
SEECIX GlobePEER Route Server Informational BGP Communities
UAE-IX GlobePEER Route Server Informational BGP Communities
Doha IX Route Server Informational BGP Communities
Looking Glass Guides
DE-CIX GlobePEER Looking Glass Guide
ACIX GlobePEER Looking Glass Guide
AF-CIX GlobePEER Looking Glass Guide
AqabaIX GlobePEER Looking Glass Guide
Borneo-IX GlobePEER Looking Glass Guide
IRAQ-IXP Looking Glass Guide
PIE Karachi Looking Glass Guide
Ruhr-CIX GlobePEER Looking Glass Guide
SEECIX GlobePEER Looking Glass Guide
UAE-IX GlobePEER Looking Glass Guide
Doha IX Looking Glass Guide
Notes on additional Routes (incl. Google VPP) via GlobePEER Route Service
Closed User Groups
DirectCLOUD
Overview and Monitoring
Cloud Connections
DirectCLOUD for Microsoft Azure
Create DirectCLOUD Connection for Azure
How to order a DirectCLOUD connection for Azure
Create or upgrade Gateways for your Azure ExpressRoute
Manage your Azure Cloud Connection
Upgrade / downgrade a DirectCLOUD service for Azure
Change DirectCLOUD configurations for Azure
Delete DirectCLOUD configurations for Azure
Monitoring Azure ExpressRoute uptime
Monitor your connection
Updating the Cloud Key for Your Azure DirectCLOUD Service
Delete your Azure Cloud connection
FAQ DirectCLOUD for Microsoft Azure
DirectCLOUD for AWS
Create DirectCLOUD connection for AWS
Manage your DirectCLOUD connection for AWS
Upgrade / downgrade the connection
Change DirectCLOUD configurations for AWS
Delete DirectCLOUD configurations for AWS
Monitoring AWS DirectConnect uptime
Monitor your connection
Delete your AWS Cloud connection
DirectCLOUD for IBM
Create DirectCLOUD connection for IBM
Manage your DirectCLOUD connection for IBM
Upgrade / downgrade a DirectCLOUD service for IBM
Change DirectCLOUD configurations for IBM
Delete DirectCLOUD configurations for IBM
Monitor your connection
Delete your IBM Cloud connection
DirectCLOUD for GCloud
Create DirectCLOUD connection for GCloud
Manage your DirectCLOUD connection for GCloud
Upgrade / downgrade the connection
Change DirectCLOUD configurations for GCloud
Delete DirectCLOUD configurations for GCloud
Monitor your connection
Delete your GCloud connection
DirectCLOUD for Oracle
Cloud ROUTER
Overview & use cases
Create / Manage your Cloud ROUTER
Create / Manage the configurations
Add a configuration
Upgrade / downgrade a configuration
Change your Cloud ROUTER configurations
Monitor your configurations
Delete a Cloud ROUTER configuration
Advanced Settings Cloud ROUTER
VirtualPNI
Overview VirtualPNI
Create your VirtualPNI
Order and configure your VirtualPNI between your own resources
Order and configure your VirtualPNI to a third-party provider
Manage your VirtualPNI
Upgrade / Downgrade your VirtualPNI service
Change VirtualPNI configurations
Delete VirtualPNI configurations
Monitor your VirtualPNI
Delete your VirtualPNI service
Colocation
Out-of-band access to your DE-CIX colocated equipment
Shipping Information
Colocation equipment management for Digital Realty data centers
DE-CIX API
Overview DE-CIX API
Quick API Reference
Cloud ROUTER Postman Collection
Monitor and Visibility of Learned Routes and Advertised Routes by API
BGP Ingress and Egress Filters Usage by API
Terraform Provider
Terraform Provider Overview
Getting Started
Provider Configuration
Managing Services
State Management
End-to-End Example
Service Insights System
Service Insights System - Tutorial
Standard customer Service Insights Tutorial (for customers without reselling services or DaaS location)
Service Telemetry Insights Tutorial
GlobePEER Traffic Insights Tutorial
GlobePEER Threat Insights Tutorial
Cloud ROUTER Traffic Insights Tutorial
Reseller Service Insights Tutorial
Reseller GlobePEER Traffic Insights Tutorial
Reseller GlobePEER Threat Insights Tutorial
Reseller Service Telemetry Insights Tutorial
Partner (DaaS) Service Insights Tutorial
Partner GlobePEER Traffic Insights Tutorial
Partner Service Telemetry Insights Tutorial
Partner GlobePEER Threat Insights Tutorial
Service Insights Tutorial - General Informations
Service Insights System
Account administration
Add new users or subcustomers
Manage user roles and permissions
Multi-Factor-Authentification
Retrieving username and reset password
Delete a user
Customer service and ticket system
Table of Contents
- All Categories
- Colocation
- Colocation equipment management for Digital Realty data centers
Colocation equipment management for Digital Realty data centers

This article provides information about the service of your colocated equipment in Digital Realty (DRT) data centers, including technical specifications of the racks and instructions for requesting access, delivery, pickup, or remote hands services via our portal.
Important information in advance
At this time we do not offer colocation as a standard product.
Furthermore, we do not offer the following:
- substantial power upgrades for current colocation customers
- migration / consolidation / upgrade projects for current colocation customers
- colocation space bigger than 40U
Prerequisites
To make use of our colocation product, you need to order at least one Access and one additional DE-CIX service together with colocation.
You find a guide for ordering an Access here.
Service specification
The table below presents the technical specifications related to our colocation product.
Topic | Specification / description |
Offered products | 5 rack units
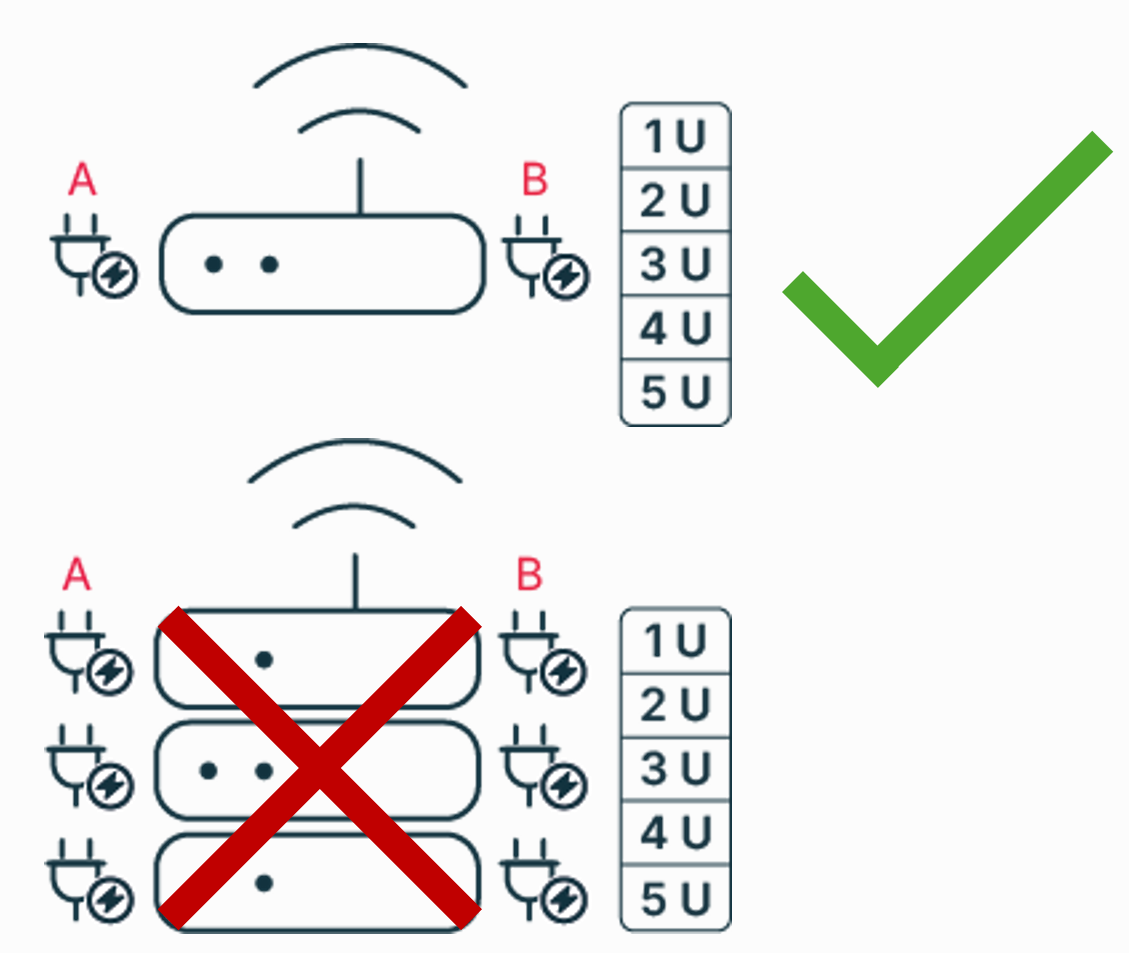 Important: Make sure to keep the power draw below 500W, as displayed in the upper image. An arrangement as depicted in the lower image is not permitted. 40 rack units
|
Allowed hardware devices | DE-CIX Colocation is designed to install network devices (routers) for connection to the DE-CIX Internet Exchange or Cloud Exchange in the provided rack. |
Rack dimensions | 60 x 100 cm (width x depth), in a rack with 40 rack units |
Power supply | 230V AC |
PDU plugs (power distribution unit) | 5 rack units
40 rack units
|
Amp fuse | 2 x 16A (A+B feed) |
Quality level |
|
Compliance of Data Center |
|
Access Request
The purpose of an Access Request is to install or remove hardware from the rack by yourself.
How to request
- Under Colocation, select Access request.
- Provide the following information
- Name
- Phone number
- Desired Access Start and End Date/Time
- Type of equipment you want to install/remove
- Remarks for additional information
- Persons visiting
- Optionally: File for maintenance schedule
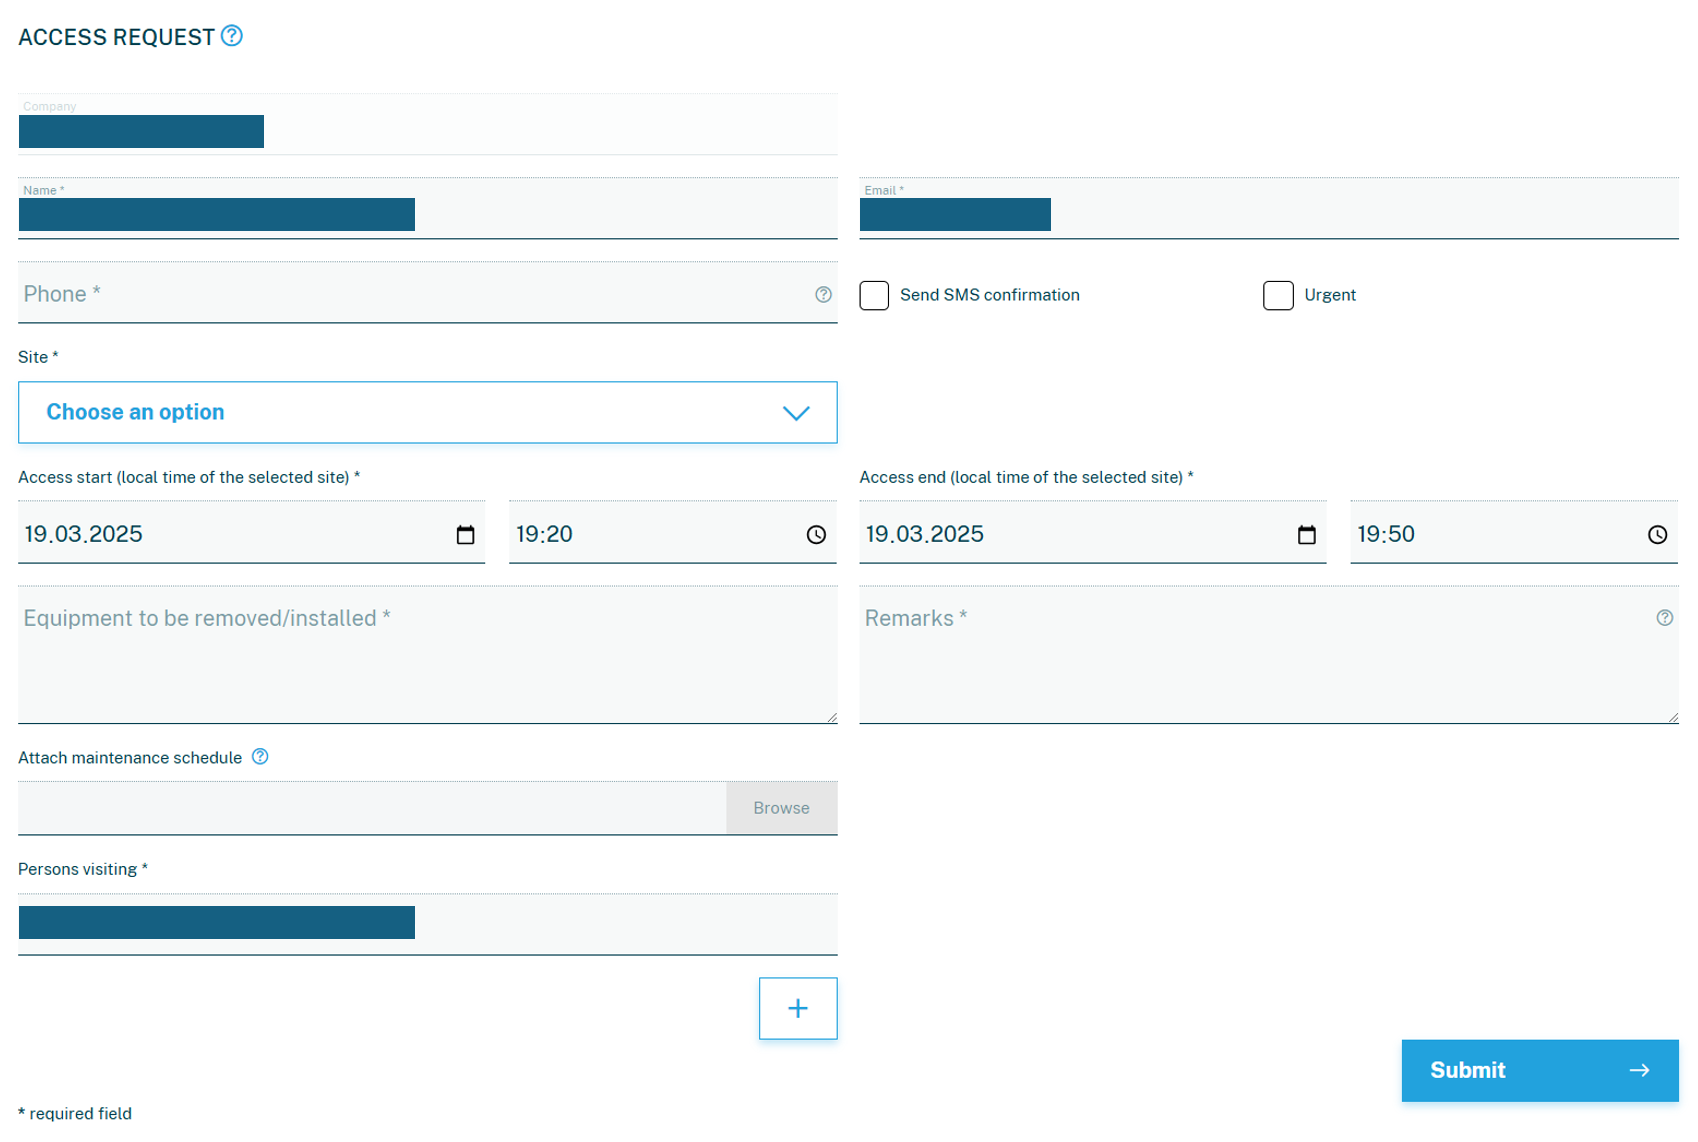 Please note: For urgent matters (e.g., an incident), select the Urgent checkbox.
- Click on Submit.
What to consider
The following rules apply when accessing the data center building:
- Only registered persons are granted access to the facility. Unregistered persons are not permitted entry.
- Registered persons must present their identity card or passport at the security desk. A driver's license is not sufficient.
- Access is restricted to the registered time slot. If there is a delay, you must immediately contact DE-CIX Customer Service for further instructions.
- When reaching the security desk at the Digital Realty data center, you receive a temporary access badge and the PIN code for the rack door.
- DE-CIX does not provide assistance. You must install the equipment yourself.
The following must be observed when installing / removing new hardware in the rack:
- Dual power feed: You must connect all devices to both the A-feed (primary) and B-feed (secondary), using separate PDUs, to prevent power outages and downtime.
- Special case: If a device has only one power connection installed, you must install an Automatic Transfer Switch (ATS) 16A by yourself.
- Hot air blower: The hardware must be aligned in the rack to ensure hot air is blown into the hot aisle, not the cold aisle.
Delivery Announcement
The purpose of a Delivery Service Request is to arrange the delivery of packages (containing hardware) to the data center if you don't bring them with you when accessing the facility.
How to request
- Under Colocation, select Delivery announcement.
- Provide the following information
- Name
- Phone number
- Target site
- Pickup carrier
- Shipment tracking ID
- Estimated delivery date
- Shipment contents
- Optionally: Remarks for additional information
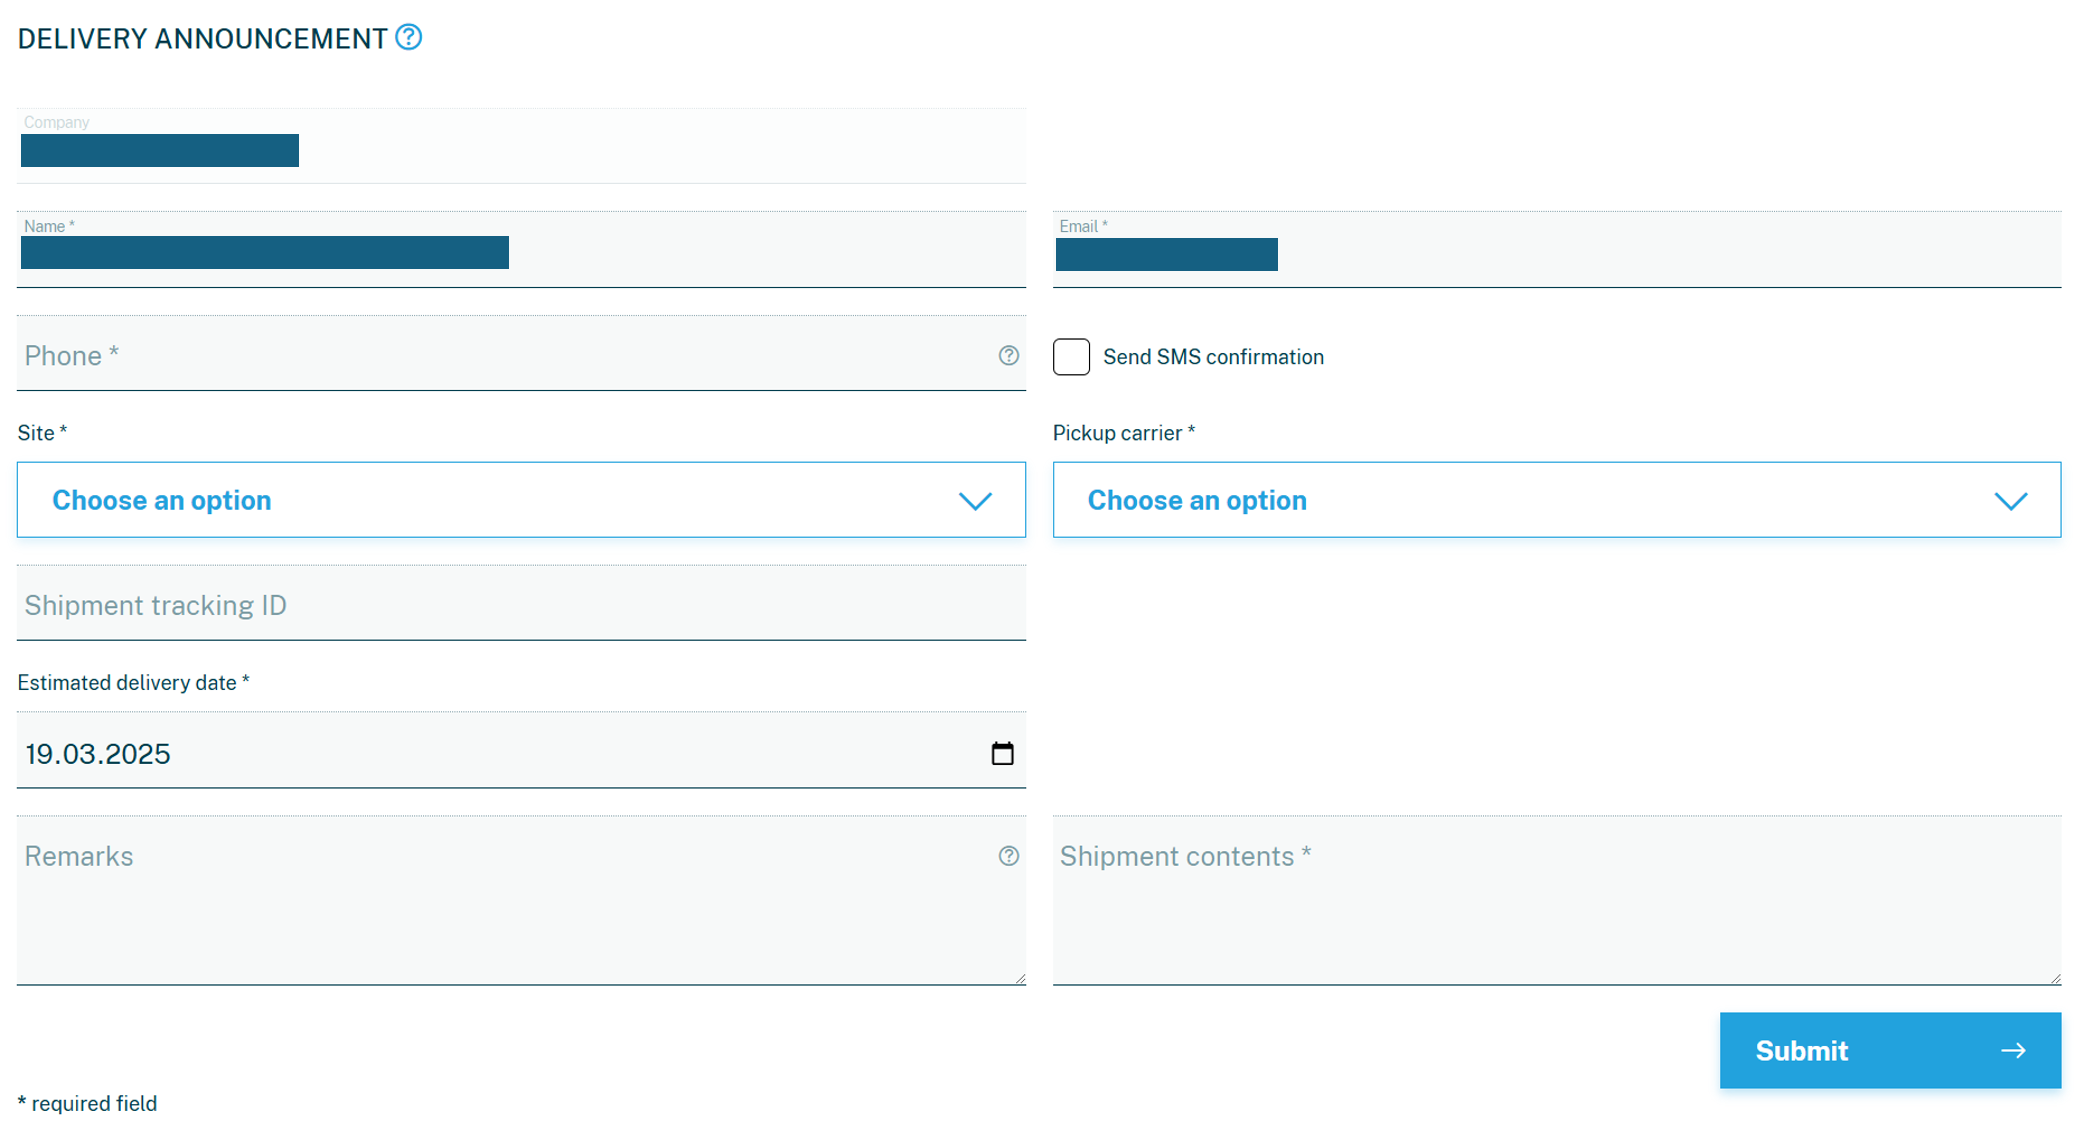
- Click on Submit.
What to consider
- Delivery Service is free of charge unless the shipment is stored for more than 5 days.
- The package shipment must be correctly labeled, also including the following information:
- Name of DE-CIX as cage owner
- Name of the end customer (you)
- Room number
- Rack number for which the package is intendedImportant: A label with only the name of the data center is not sufficient and will not be delivered!
Pickup Announcement
The purpose of a Pickup Service Request is to have Digital Realty remove hardware from the rack, pack it, label it, and hand it over to a courier for delivery if you are unable to do it yourself on-site.
How to request
- Under Colocation, select Pickup announcement.
- Provide the following information
- Name
- Phone number
- Target site
- Pickup carrier
- Storage ID / Remote Hands ticket
- Pickup date
- Optionally: Remarks for additional information
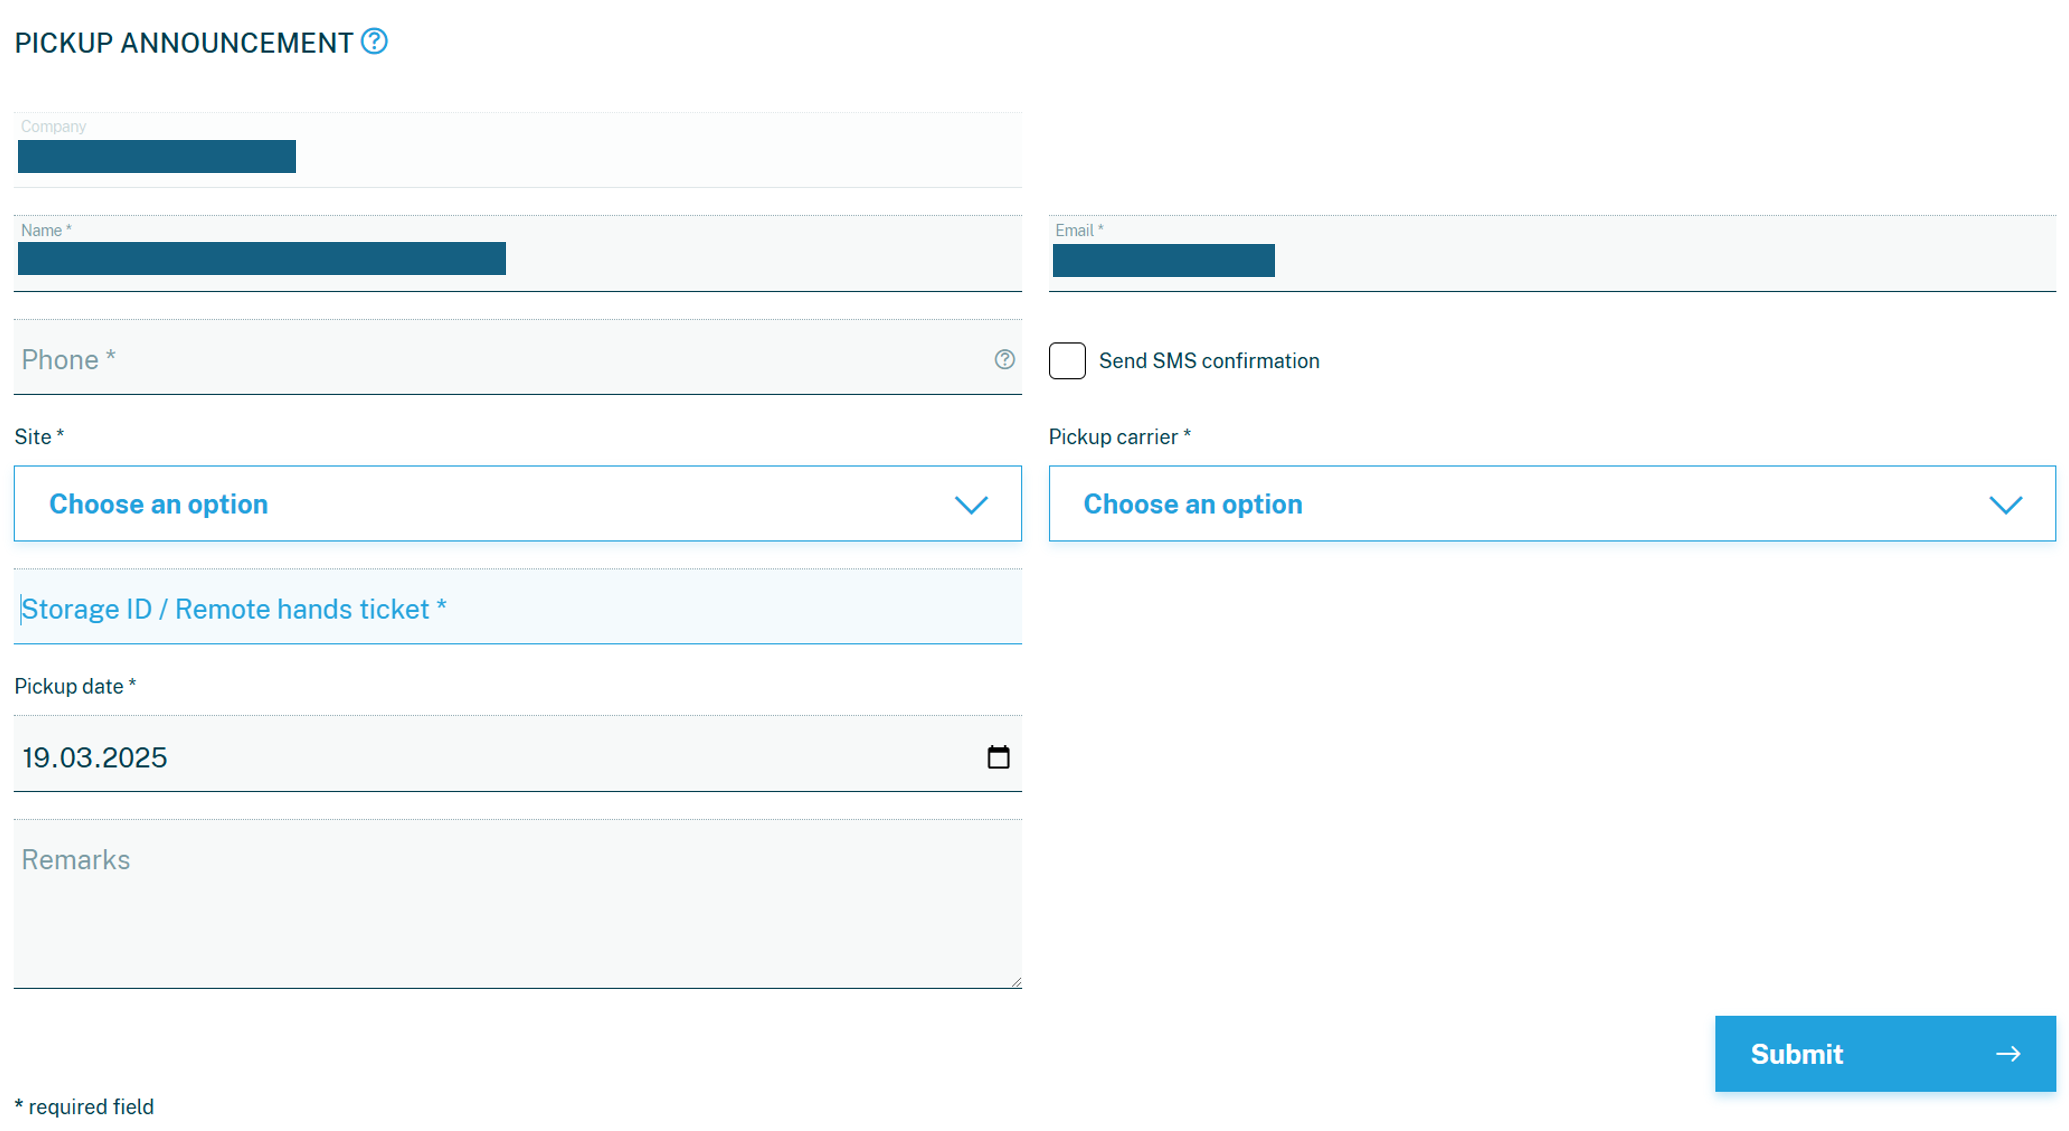
- Click on Submit.
What to consider
- The Pickup service is a charged service.
- You need to specify the following information:
- Rack number
- Rack unit number
- Destination address
- Insurance value of the shipment
Remote Hands Request
The purpose of a Remote Hands Request is to request basic on-site support from DRT technicians for customer equipment, such as resetting interfaces, powering equipment on or off, operating buttons, and checking displays.
How to request
- Under Colocation, select Remote hands request.
- Provide the following information
- Name
- Phone number
- Target site
- Specific position
- Room
- Rack
- Shelf
- Device
- Start date and time of work
- Remarks for additional information
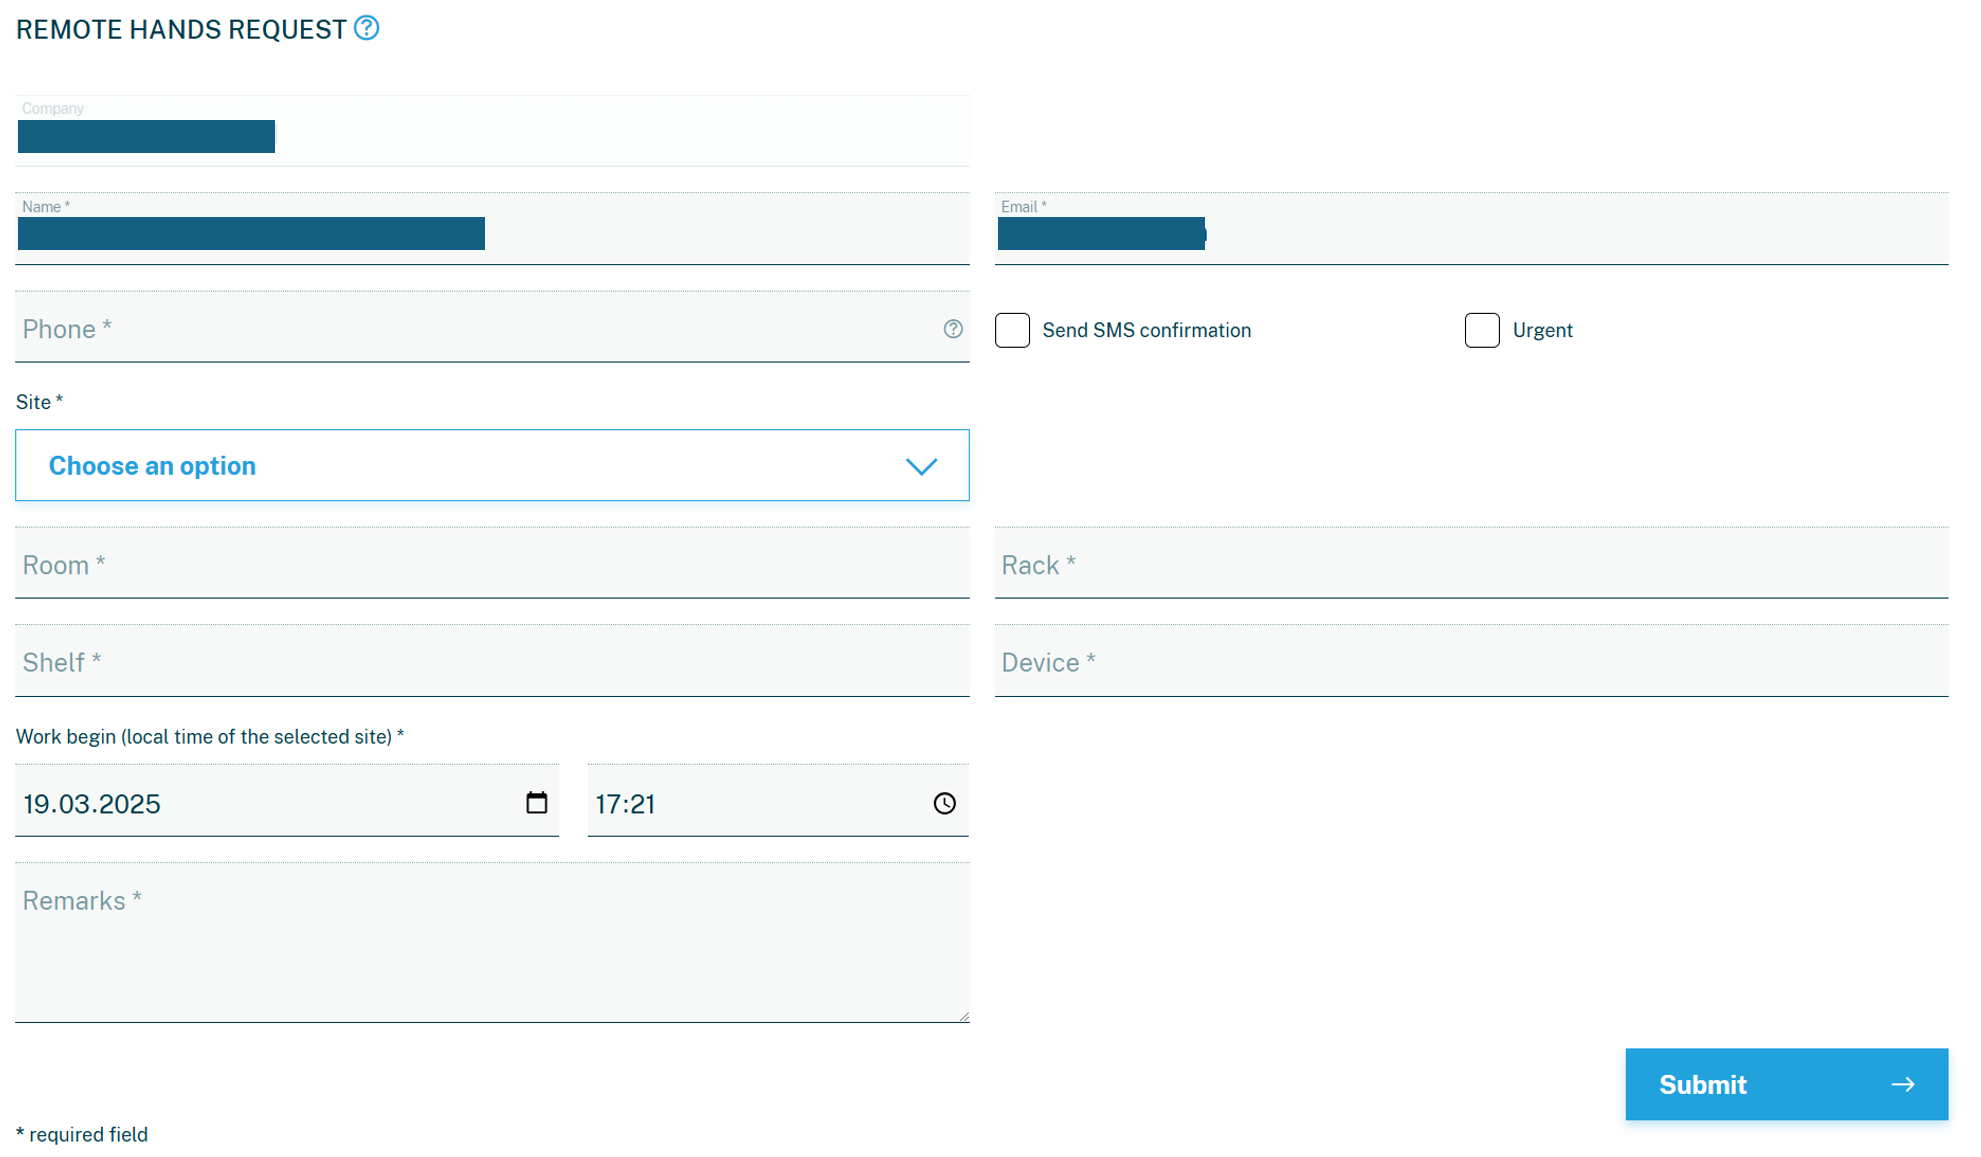 Please note: For urgent matters (e.g., an incident), select the Urgent checkbox. The earliest access time is 60 minutes after the request.
- Click on Submit.
What to consider
- No other services beyond those listed above are covered.
- You need to specify the following information:
- What exactly is to be carried out.
- Prefered way if cabling is needed: A cabling plan (Excel list) should be included showing from which port (device serial number & rack unit) the connection starts and to which target device (device serial number & rack unit) it leads - ideally with a picture, as every customer counts differently.
- For the following purposes only, each customer is entitled to 2 Remote Hands Requests (max. 1 hour of service each, including preparation) per year, free of charge:
- re-setting interfaces during the initial provisioning of the Access and related services & cross connects (after the installation of the hardware by yourself) and not for permanent use
- re-setting interfaces as a result of an upgrade order of further Accesses / services
- re-setting interfaces after removal of hardware (router) in the colocation rackImportant: Any additional tickets (beyond 2 or for a different purpose) are not free of charge and must be purchased through a subscription.
Need help? Get in touch with our customer service.