Release Notes
Getting started
DE-CIX Access
Overview and technical specifications
Create a new Access or LAG
Monitor your Access
Delete your Access
GlobePEER
Overview GlobePEER
Create your GlobePEER service
Manage your GlobePEER service
Delete your GlobePEER service
Blackholing Services
Route Service
Route Server Guides
DE-CIX ASEAN GlobePEER Route Server Guide
DE-CIX Barcelona GlobePEER Route Server Guide
DE-CIX Chicago GlobePEER Route Server Guide
DE-CIX Copenhagen GlobePEER Route Server Guide
DE-CIX Dallas GlobePEER Route Server Guide
DE-CIX Dusseldorf GlobePEER Route Server Guide
DE-CIX Esbjerg GlobePEER Route Server Guide
DE-CIX Frankfurt GlobePEER Route Server Guide
DE-CIX Hamburg GlobePEER Route Server Guide
DE-CIX Helsinki GlobePEER Route Server Guide
DE-CIX Houston GlobePEER Route Server Guide
DE-CIX Istanbul GlobePEER Route Server Guide
DE-CIX Jakarta GlobePEER Route Server Guide
DE-CIX Kristiansand GlobePEER Route Server Guide
DE-CIX Kuala Lumpur GlobePEER Route Server Guide
DE-CIX Leipzig GlobePEER Route Server Guide
DE-CIX Lisbon GlobePEER Route Server Guide
DE-CIX Madrid GlobePEER Route Server Guide
DE-CIX Malaysia GlobePEER Route Server Guide
DE-CIX Marseille GlobePEER Route Server Guide
DE-CIX Mexico GlobePEER Route Server Guide
DE-CIX Munich GlobePEER Route Server Guide
DE-CIX New York GlobePEER Route Server Guide
DE-CIX Oslo GlobePEER Route Server Guide
DE-CIX Palermo GlobePEER Route Server Guide
DE-CIX Phoenix GlobePEER Route Server Guide
DE-CIX Richmond GlobePEER Route Server Guide
DE-CIX Rio De Janeiro GlobePEER Route Server Guide
DE-CIX Sao Paulo GlobePEER Route Server Guide
ACIX GlobePEER Route Server Guide
AF-CIX GlobePEER Route Server Guide
AqabaIX GlobePEER Route Server Guide
Borneo-IX GlobePEER Route Server Guide
Doha IX Route Server Guide
IRAQ-IXP Route Server Guide
Penang IX Route Server Guide
PIE Karachi GlobePEER Route Server Guide
Ruhr-CIX GlobePEER Route Server Guide
SEECIX GlobePEER Route Server Guide
UAE-IX GlobePEER Route Server Guide
Action BGP Communities (Route Server Control)
DE-CIX GlobePEER Route Server Action BGP Communities
ACIX GlobePEER Route Server Action BGP Communities
AF-CIX GlobePEER Route Server Action BGP Communities
AqabaIX GlobePEER Route Server Action BGP Communities
Borneo-IX GlobePEER Route Server Action BGP Communities
IRAQ-IXP Route Server Action BGP Communities
PIE Karachi GlobePEER Route Server Action BGP Communities
Ruhr-CIX GlobePEER Route Server Action BGP Communities
SEECIX GlobePEER Route Server Action BGP Communities
UAE-IX GlobePEER Route Server Action BGP Communities
Doha IX Route Server Action BGP Communities
Informational BGP Communities (Route Details)
DE-CIX GlobePEER Route Server Informational BGP Communities
ACIX GlobePEER Route Server Informational BGP Communities
AF-CIX GlobePEER Route Server Informational BGP Communities
AqabaIX GlobePEEER Route Server Informational BGP Communities
Borneo-IX GlobePEER Route Server Informational BGP Communities
IRAQ-IXP Route Server Informational BGP Communities
PIE Karachi GlobePEER Route Server Informational BGP Communities
Ruhr-CIX GlobePEER Route Server Informational BGP Communities
SEECIX GlobePEER Route Server Informational BGP Communities
UAE-IX GlobePEER Route Server Informational BGP Communities
Doha IX Route Server Informational BGP Communities
Looking Glass Guides
DE-CIX GlobePEER Looking Glass Guide
ACIX GlobePEER Looking Glass Guide
AF-CIX GlobePEER Looking Glass Guide
AqabaIX GlobePEER Looking Glass Guide
Borneo-IX GlobePEER Looking Glass Guide
IRAQ-IXP Looking Glass Guide
PIE Karachi Looking Glass Guide
Ruhr-CIX GlobePEER Looking Glass Guide
SEECIX GlobePEER Looking Glass Guide
UAE-IX GlobePEER Looking Glass Guide
Doha IX Looking Glass Guide
Notes on additional Routes (incl. Google VPP) via GlobePEER Route Service
Closed User Groups
DirectCLOUD
Overview and Monitoring
Cloud Connections
DirectCLOUD for Microsoft Azure
Create DirectCLOUD Connection for Azure
How to order a DirectCLOUD connection for Azure
Create or upgrade Gateways for your Azure ExpressRoute
Manage your Azure Cloud Connection
Upgrade / downgrade a DirectCLOUD service for Azure
Change DirectCLOUD configurations for Azure
Delete DirectCLOUD configurations for Azure
Monitoring Azure ExpressRoute uptime
Monitor your connection
Updating the Cloud Key for Your Azure DirectCLOUD Service
Delete your Azure Cloud connection
FAQ DirectCLOUD for Microsoft Azure
DirectCLOUD for AWS
Create DirectCLOUD connection for AWS
Manage your DirectCLOUD connection for AWS
Upgrade / downgrade the connection
Change DirectCLOUD configurations for AWS
Delete DirectCLOUD configurations for AWS
Monitoring AWS DirectConnect uptime
Monitor your connection
Delete your AWS Cloud connection
DirectCLOUD for IBM
Create DirectCLOUD connection for IBM
Manage your DirectCLOUD connection for IBM
Upgrade / downgrade a DirectCLOUD service for IBM
Change DirectCLOUD configurations for IBM
Delete DirectCLOUD configurations for IBM
Monitor your connection
Delete your IBM Cloud connection
DirectCLOUD for GCloud
Create DirectCLOUD connection for GCloud
Manage your DirectCLOUD connection for GCloud
Upgrade / downgrade the connection
Change DirectCLOUD configurations for GCloud
Delete DirectCLOUD configurations for GCloud
Monitor your connection
Delete your GCloud connection
DirectCLOUD for Oracle
Cloud ROUTER
Overview & use cases
Create / Manage your Cloud ROUTER
Create / Manage the configurations
Add a configuration
Upgrade / downgrade a configuration
Change your Cloud ROUTER configurations
Monitor your configurations
Delete a Cloud ROUTER configuration
Advanced Settings Cloud ROUTER
VirtualPNI
Overview VirtualPNI
Create your VirtualPNI
Order and configure your VirtualPNI between your own resources
Order and configure your VirtualPNI to a third-party provider
Manage your VirtualPNI
Upgrade / Downgrade your VirtualPNI service
Change VirtualPNI configurations
Delete VirtualPNI configurations
Monitor your VirtualPNI
Delete your VirtualPNI service
Colocation
Out-of-band access to your DE-CIX colocated equipment
Shipping Information
Colocation equipment management for Digital Realty data centers
DE-CIX API
Overview DE-CIX API
Quick API Reference
Cloud ROUTER Postman Collection
Monitor and Visibility of Learned Routes and Advertised Routes by API
BGP Ingress and Egress Filters Usage by API
Terraform Provider
Terraform Provider Overview
Getting Started
Provider Configuration
Managing Services
State Management
End-to-End Example
Service Insights System
Service Insights System - Tutorial
Standard customer Service Insights Tutorial (for customers without reselling services or DaaS location)
Service Telemetry Insights Tutorial
GlobePEER Traffic Insights Tutorial
GlobePEER Threat Insights Tutorial
Cloud ROUTER Traffic Insights Tutorial
Reseller Service Insights Tutorial
Reseller GlobePEER Traffic Insights Tutorial
Reseller GlobePEER Threat Insights Tutorial
Reseller Service Telemetry Insights Tutorial
Partner (DaaS) Service Insights Tutorial
Partner GlobePEER Traffic Insights Tutorial
Partner Service Telemetry Insights Tutorial
Partner GlobePEER Threat Insights Tutorial
Service Insights Tutorial - General Informations
Service Insights System
Account administration
Add new users or subcustomers
Manage user roles and permissions
Multi-Factor-Authentification
Retrieving username and reset password
Delete a user
Customer service and ticket system
Table of Contents
- All Categories
- GlobePEER
- Create your GlobePEER service
- How to order a GlobePEER service
How to order a GlobePEER service

You can order your GlobePEER and GlobePEER Remote services through your sales representative or the DE-CIX Self Service Portal.
This article contains step-by-step instructions on how to order and initially configure your GlobePEER and GlobePEER Remote services via the DE-CIX Self Service Portal.
- Login to the DE-CIX Self Sevice Portal
- You can either in the Dashboard, go to the Getting Started section and Click Add Service in the Create a new Service tile. Then select either Add GlobePEER Service or Add GlobePEER Remote Service.
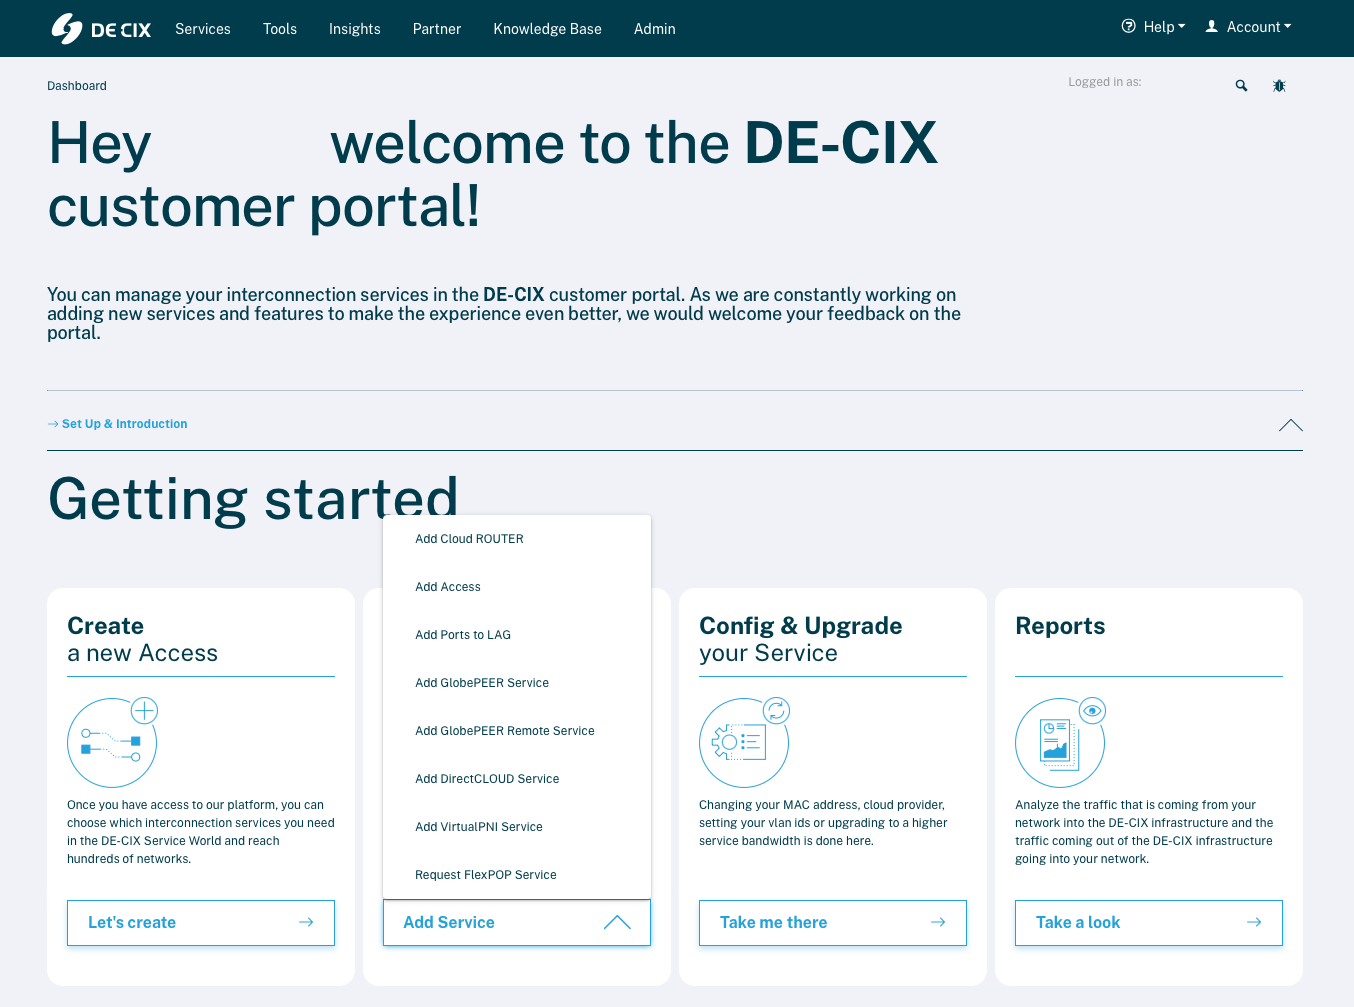
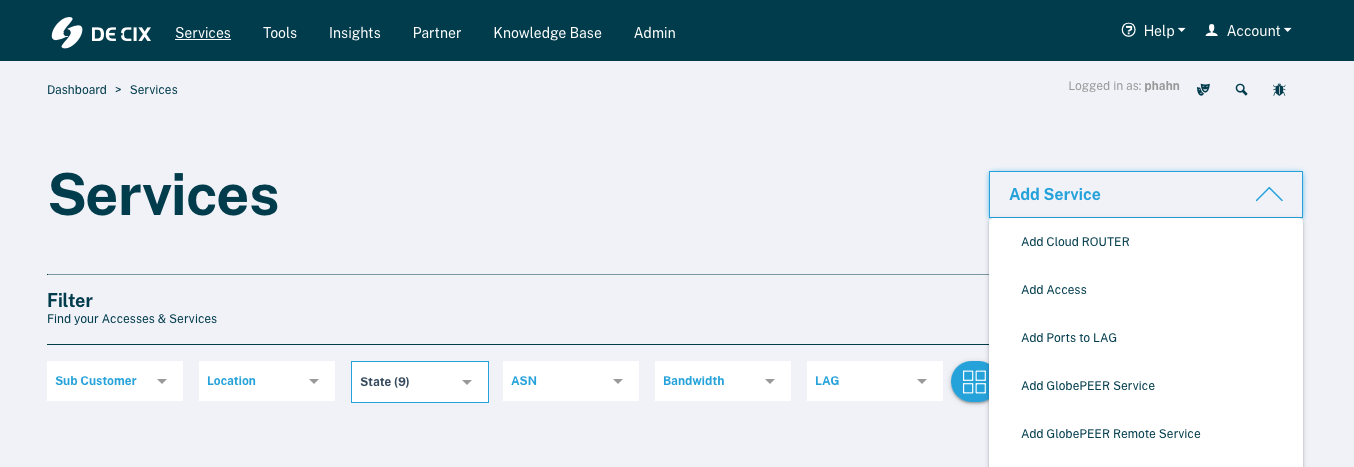
- Alternatively, select Services in the main navigation at the top of the page and click the Add Services button on the top-right. Then select either Add GlobePEER Service or Add GlobePEER Remote Service.
- 1. General Details Section
- Account: Select your own account from the drop down menu. If you placing an order on behalf of a Sub-Customer, choose the corresponding Sub-Customer accoount from the drop down menu.
If you want to add a new Sub-Customer, select Sub customer from the Account drop down menu in the top right and create a new Sub-Customer first.- Access: Select the Access for which you want to order the GlobePEER service
- (Remote) GlobePEER Service Location: Select the location where you wish to establish the GlobePEER service from the drop down menu.
When the Access and the GlobePEER service are in different locations, the GlobePEER service is automatically configured as a GlobePEER Remote Service.- Bandwidth: You can select the GlobePEER Service bandwidth either via the quick selection buttons, which are automatically adjusted to the access capacity, or via the Other Bandwidth option dropdown menu for more granular selection.
- Provisioned Bandwidth on your Access: The bandwidth bar shows how much of your Access is currently in use – including provisioned services (blue), temporary over-provisioning (red), and unused capacity (grey).
 The bar shows how much service capacity you have already booked on the choosen Access. The booked service capacity should never exceed the available Access capacity, as this can lead to service degradation such as packet loss.
- Your Purchase Order Reference: Here you can enter your own commercial reference to identify the service in your Business Support Systems.
- After you have filled in all required fields, the prices for the available contract terms will appear below the bandwidth bar. Select a term by clicking the corresponding field, then click the Next button in the bottom right.
 If you have not filled in all required fields or have not selected a contract term, you cannot proceed to the next step. In that case, the button in the bottom right will show Contact us instead of Next.
 - 2. Technical Details Section
- Your Service Reference: Use this field to enter your technical reference that uniquely identifies this GlobePEER service in your Operational Support Systems. The reference can be any identifier that helps you quickly recognise the service within the DE-CIX portal.
- ASN: Enter your Autonomous System Number (ASN). This is required to identify your network and establish BGP sessions.
- VLAN Tag: VLAN tagging is required for all services to ensure proper traffic separation and secure service delivery. Currently, the self-service portal only supports dot1q VLAN tagging; if you wish to configure qinq, please get in touch with your sales representatives to place your order.
- MAC address: Select the MAC address of your interface from the dop down menu or enter a new MAC adress.
The MAC address needs to be unique in each Peering LAN.- BGP MD5 Authentication: DE-CIX operates so-called route server systems (see RFC7947 for a detailed description) to facilitate the exchange of BGP announcements between peers at DE-CIX. Please review our Route Server Guides to learn more about the filtering mechanism that can be used to filter BGP announcements etc. Enable this to set the BGP password for additional security on your BGP sessions with route servers. To get a new password, click generate.
- IRR Filtering: Enable this in case your IPv4 and IPv6 AS-SETs are not identical. You can then specify separate IPv4 and IPv6 ones.
Provide your AS-SET (AS-MACRO) and the corresponding RIR.
Accurate prefix announcements and robust route validation are critical for ensuring your traffic reliably reaches its destinations. At DE-CIX, we validate prefixes using public routing databases from Internet Routing Registries (IRR). For more information please check out the section Ensure Accurate Prefix Announcements and RPKI Validation. - Continue to the third and final step by clicking Next.
- 3. Summary Section
Review your order details.
Optionally provide an additional e-mail address for order confirmation.
If all data is correct, click Order to provision the service.