Release Notes
Getting started
DE-CIX Access
Overview and technical specifications
Create a new Access or LAG
Monitor your Access
Delete your Access
GlobePEER
Overview GlobePEER
Create your GlobePEER service
Manage your GlobePEER service
Delete your GlobePEER service
Blackholing Services
Route Service
Route Server Guides
DE-CIX ASEAN GlobePEER Route Server Guide
DE-CIX Barcelona GlobePEER Route Server Guide
DE-CIX Chicago GlobePEER Route Server Guide
DE-CIX Copenhagen GlobePEER Route Server Guide
DE-CIX Dallas GlobePEER Route Server Guide
DE-CIX Dusseldorf GlobePEER Route Server Guide
DE-CIX Esbjerg GlobePEER Route Server Guide
DE-CIX Frankfurt GlobePEER Route Server Guide
DE-CIX Hamburg GlobePEER Route Server Guide
DE-CIX Helsinki GlobePEER Route Server Guide
DE-CIX Houston GlobePEER Route Server Guide
DE-CIX Istanbul GlobePEER Route Server Guide
DE-CIX Jakarta GlobePEER Route Server Guide
DE-CIX Kristiansand GlobePEER Route Server Guide
DE-CIX Kuala Lumpur GlobePEER Route Server Guide
DE-CIX Leipzig GlobePEER Route Server Guide
DE-CIX Lisbon GlobePEER Route Server Guide
DE-CIX Madrid GlobePEER Route Server Guide
DE-CIX Malaysia GlobePEER Route Server Guide
DE-CIX Marseille GlobePEER Route Server Guide
DE-CIX Mexico GlobePEER Route Server Guide
DE-CIX Munich GlobePEER Route Server Guide
DE-CIX New York GlobePEER Route Server Guide
DE-CIX Oslo GlobePEER Route Server Guide
DE-CIX Palermo GlobePEER Route Server Guide
DE-CIX Phoenix GlobePEER Route Server Guide
DE-CIX Richmond GlobePEER Route Server Guide
DE-CIX Rio De Janeiro GlobePEER Route Server Guide
DE-CIX Sao Paulo GlobePEER Route Server Guide
ACIX GlobePEER Route Server Guide
AF-CIX GlobePEER Route Server Guide
AqabaIX GlobePEER Route Server Guide
Borneo-IX GlobePEER Route Server Guide
Doha IX Route Server Guide
IRAQ-IXP Route Server Guide
Penang IX Route Server Guide
PIE Karachi GlobePEER Route Server Guide
Ruhr-CIX GlobePEER Route Server Guide
SEECIX GlobePEER Route Server Guide
UAE-IX GlobePEER Route Server Guide
Action BGP Communities (Route Server Control)
DE-CIX GlobePEER Route Server Action BGP Communities
ACIX GlobePEER Route Server Action BGP Communities
AF-CIX GlobePEER Route Server Action BGP Communities
AqabaIX GlobePEER Route Server Action BGP Communities
Borneo-IX GlobePEER Route Server Action BGP Communities
IRAQ-IXP Route Server Action BGP Communities
PIE Karachi GlobePEER Route Server Action BGP Communities
Ruhr-CIX GlobePEER Route Server Action BGP Communities
SEECIX GlobePEER Route Server Action BGP Communities
UAE-IX GlobePEER Route Server Action BGP Communities
Doha IX Route Server Action BGP Communities
Informational BGP Communities (Route Details)
DE-CIX GlobePEER Route Server Informational BGP Communities
ACIX GlobePEER Route Server Informational BGP Communities
AF-CIX GlobePEER Route Server Informational BGP Communities
AqabaIX GlobePEEER Route Server Informational BGP Communities
Borneo-IX GlobePEER Route Server Informational BGP Communities
IRAQ-IXP Route Server Informational BGP Communities
PIE Karachi GlobePEER Route Server Informational BGP Communities
Ruhr-CIX GlobePEER Route Server Informational BGP Communities
SEECIX GlobePEER Route Server Informational BGP Communities
UAE-IX GlobePEER Route Server Informational BGP Communities
Doha IX Route Server Informational BGP Communities
Looking Glass Guides
DE-CIX GlobePEER Looking Glass Guide
ACIX GlobePEER Looking Glass Guide
AF-CIX GlobePEER Looking Glass Guide
AqabaIX GlobePEER Looking Glass Guide
Borneo-IX GlobePEER Looking Glass Guide
IRAQ-IXP Looking Glass Guide
PIE Karachi Looking Glass Guide
Ruhr-CIX GlobePEER Looking Glass Guide
SEECIX GlobePEER Looking Glass Guide
UAE-IX GlobePEER Looking Glass Guide
Doha IX Looking Glass Guide
Notes on additional Routes (incl. Google VPP) via GlobePEER Route Service
Closed User Groups
DirectCLOUD
Overview and Monitoring
Cloud Connections
DirectCLOUD for Microsoft Azure
Create DirectCLOUD Connection for Azure
How to order a DirectCLOUD connection for Azure
Create or upgrade Gateways for your Azure ExpressRoute
Manage your Azure Cloud Connection
Upgrade / downgrade a DirectCLOUD service for Azure
Change DirectCLOUD configurations for Azure
Delete DirectCLOUD configurations for Azure
Monitoring Azure ExpressRoute uptime
Monitor your connection
Updating the Cloud Key for Your Azure DirectCLOUD Service
Delete your Azure Cloud connection
FAQ DirectCLOUD for Microsoft Azure
DirectCLOUD for AWS
Create DirectCLOUD connection for AWS
Manage your DirectCLOUD connection for AWS
Upgrade / downgrade the connection
Change DirectCLOUD configurations for AWS
Delete DirectCLOUD configurations for AWS
Monitoring AWS DirectConnect uptime
Monitor your connection
Delete your AWS Cloud connection
DirectCLOUD for IBM
Create DirectCLOUD connection for IBM
Manage your DirectCLOUD connection for IBM
Upgrade / downgrade a DirectCLOUD service for IBM
Change DirectCLOUD configurations for IBM
Delete DirectCLOUD configurations for IBM
Monitor your connection
Delete your IBM Cloud connection
DirectCLOUD for GCloud
Cloud ROUTER
Overview & use cases
Create / Manage your Cloud ROUTER
Create / Manage the configurations
Add a configuration
Upgrade / downgrade a configuration
Change your Cloud ROUTER configurations
Monitor your configurations
Delete a Cloud ROUTER configuration
Advanced Settings Cloud ROUTER
VirtualPNI
Overview VirtualPNI
Create your VirtualPNI
Order and configure your VirtualPNI between two Accesses
Order and configure your VirtualPNI between Access and Cloud ROUTER
Manage your VirtualPNI
Upgrade / Downgrade your VirtualPNI service
Change VirtualPNI configurations
Delete VirtualPNI configurations
Monitor your VirtualPNI
Delete your VirtualPNI service
Colocation
Out-of-band access to your DE-CIX colocated equipment
Shipping Information
Colocation equipment management for Digital Realty data centers
DE-CIX API
Overview DE-CIX API
Quick API Reference
Cloud ROUTER Postman Collection
Monitor and Visibility of Learned Routes and Advertised Routes by API
BGP Ingress and Egress Filters Usage by API
Terraform Provider
Terraform Provider Overview
Getting Started
Provider Configuration
Managing Services
State Management
End-to-End Example
Service Insights System
Service Insights System - Tutorial
Standard customer Service Insights Tutorial (for customers without reselling services or DaaS location)
Service Telemetry Insights Tutorial
GlobePEER Traffic Insights Tutorial
GlobePEER Threat Insights Tutorial
Cloud ROUTER Traffic Insights Tutorial
Reseller Service Insights Tutorial
Reseller GlobePEER Traffic Insights Tutorial
Reseller GlobePEER Threat Insights Tutorial
Reseller Service Telemetry Insights Tutorial
Partner (DaaS) Service Insights Tutorial
Partner GlobePEER Traffic Insights Tutorial
Partner Service Telemetry Insights Tutorial
Partner GlobePEER Threat Insights Tutorial
Service Insights Tutorial - General Informations
Service Insights System
Account administration
Add new users or subcustomers
Manage user roles and permissions
Multi-Factor-Authentification
Retrieving username and reset password
Delete a user
Customer service and ticket system
- All Categories
- Cloud ROUTER
- Advanced Settings Cloud ROUTER
- Prefix Lists & Policies in Cloud ROUTER
Prefix Lists & Policies in Cloud ROUTER
The DE-CIX Cloud ROUTER allows you to manage Prefix Lists and Routing Policies to control which prefixes are exchanged with your connected networks.
Managing Prefix Lists and Policies in the DE-CIX Cloud ROUTER Portal
You can create, edit, delete, and list all Prefix Lists and Policies directly in the Portal — no API required for day-to-day management.
⚠️ Important: Creating or editing a Policy alone has no effect on your routing if not attached to a connection (e.g. DirectCLOUD AWS). A Policy only becomes active once it is attached to a connection (Inbound or Outbound). See Attaching a Policy to a Connection below.
Navigating to Prefix Lists & Policies
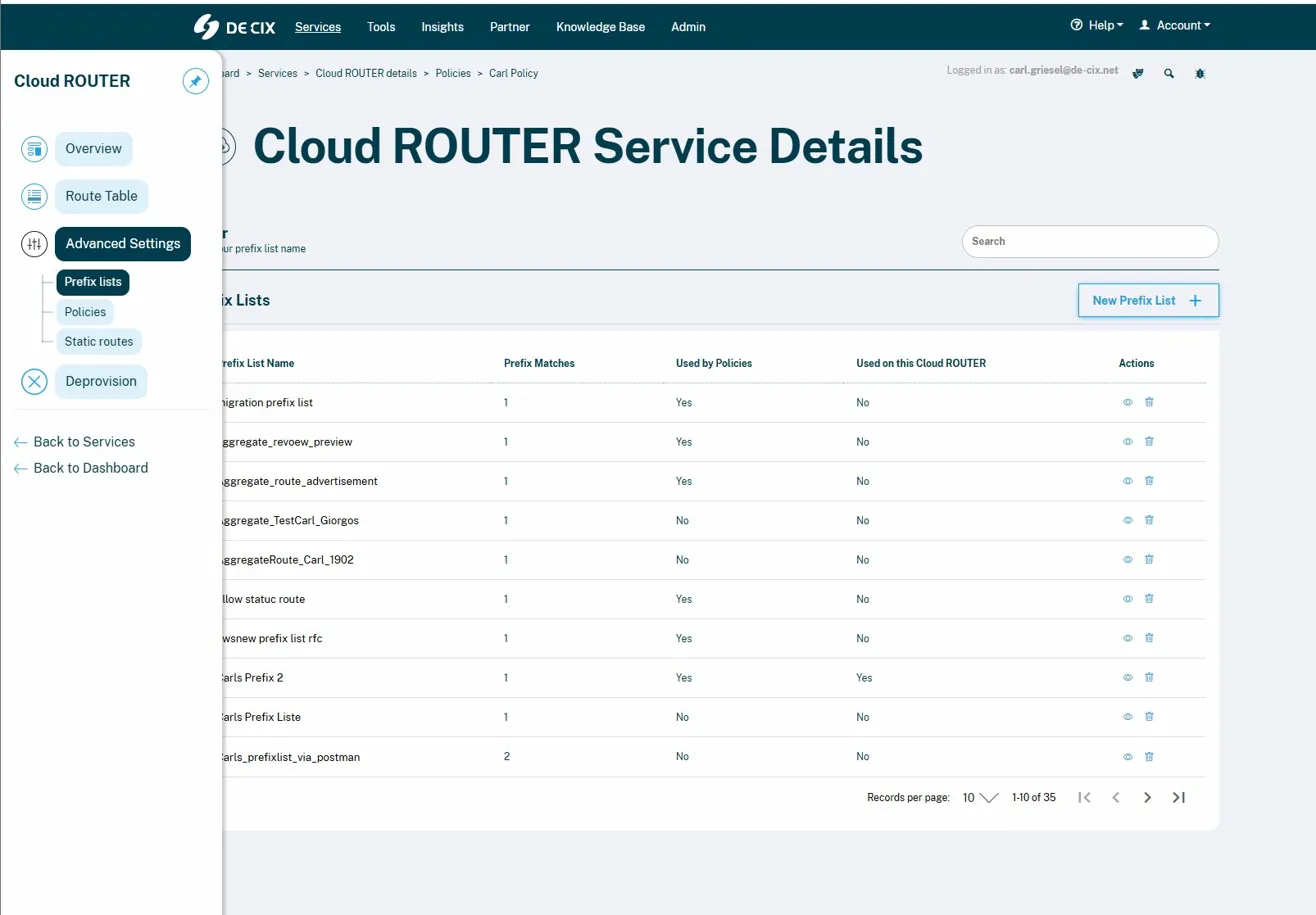
Prefix Lists and Policies are managed via the Advanced Settings section in the left-hand navigation of your Cloud ROUTER service.
- Open your Cloud ROUTER service.
- In the left sidebar, click Advanced Settings.
- You will find two dedicated sections: Prefix Lists and Policies.
Prefix Lists
Overview
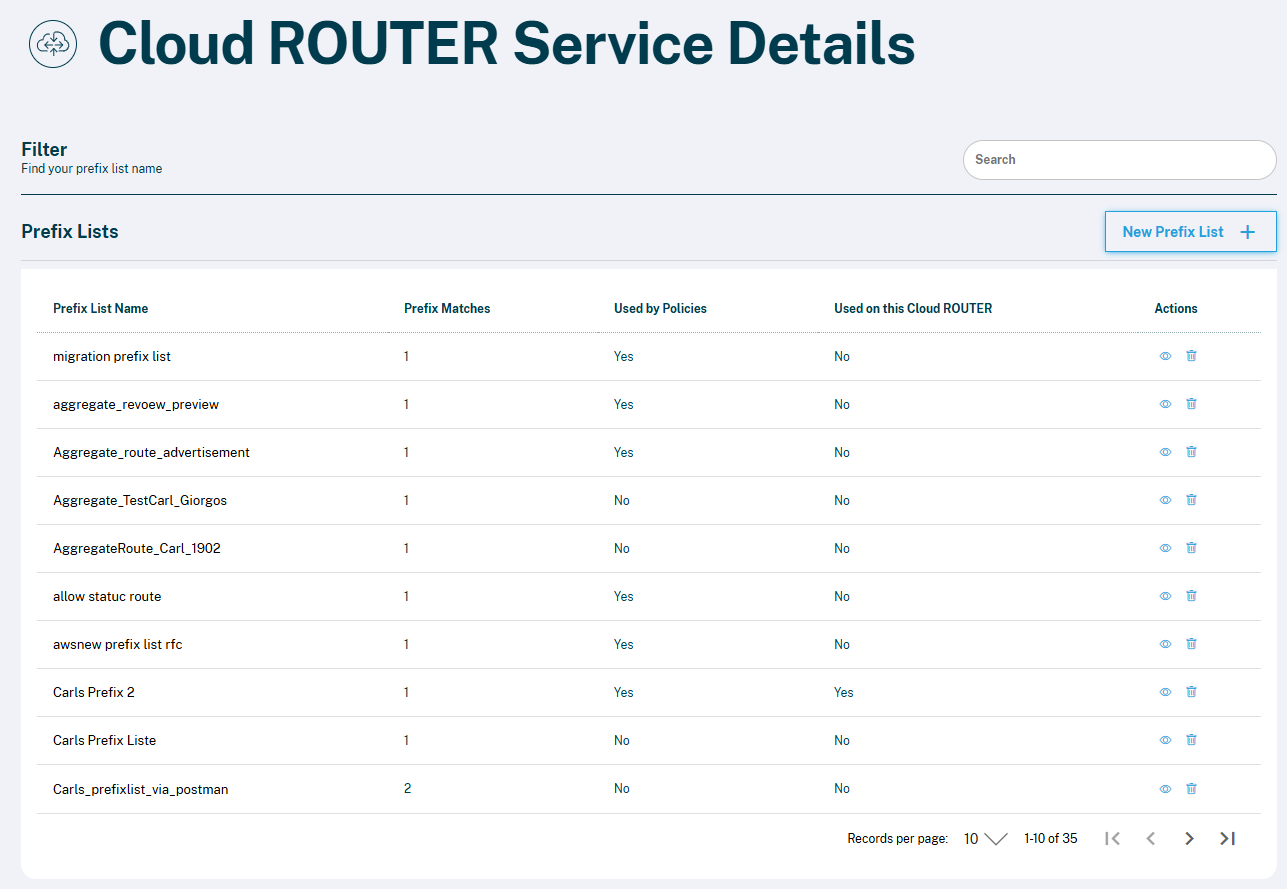
Clicking on Prefix Lists opens a full account-level overview of all Prefix Lists you have created. The table shows:
- Prefix List Name
- Prefix Matches – number of prefixes in the list
- Used by Policies – whether the Prefix List is currently attached to any Policy
- Used on this Cloud ROUTER – whether the Prefix List is actively in use on the currently viewed Cloud ROUTER
Note: One account can have multiple Cloud ROUTERs. The "Used on this Cloud ROUTER" column always refers to the specific Cloud ROUTER you are currently viewing.
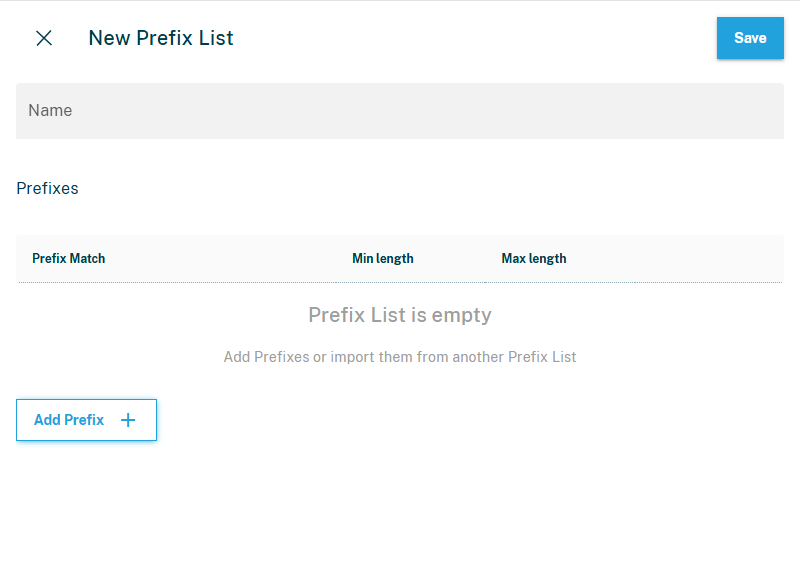
Creating a New Prefix List
- Click New Prefix List in the top-right corner.
- Enter a descriptive Name for your Prefix List.
- Click Add Prefix to add one or more prefixes:
- Prefix Match – the network prefix (e.g.,
203.0.113.0/24) - Min length – minimum prefix length allowed
- Max length – maximum prefix length allowed
- Prefix Match – the network prefix (e.g.,
- Click Save.
💡 Tip: Avoid empty Prefix Lists
It is possible to save a Prefix List without any prefix entries and attach it to a Policy. While this is technically supported, we recommend always adding at least one explicit prefix entry.
If your intention is to match all prefixes (e.g., as a catch-all at the end of a Policy), add the following entry instead of leaving the list empty:
Field | Value |
Prefix Match | 0.0.0.0/0 |
Exact? | No |
Min length | 0 |
Max length | 32 |
This makes the intended behavior explicit and ensures consistent and predictable routing across all network infrastructure.
Viewing & Editing a Prefix List
Click the eye icon (👁) next to any Prefix List to open its detail view. Here you can:
- See all prefix entries
- See which Policies this Prefix List is attached to
- Edit the Prefix List (add or remove prefixes)
Deleting a Prefix List
Click the trash icon next to a Prefix List to delete it.
Note: A Prefix List can only be deleted if it is not currently attached to any Policy. If "Used by Policies" shows Yes, detach it from the Policy first.
Policies
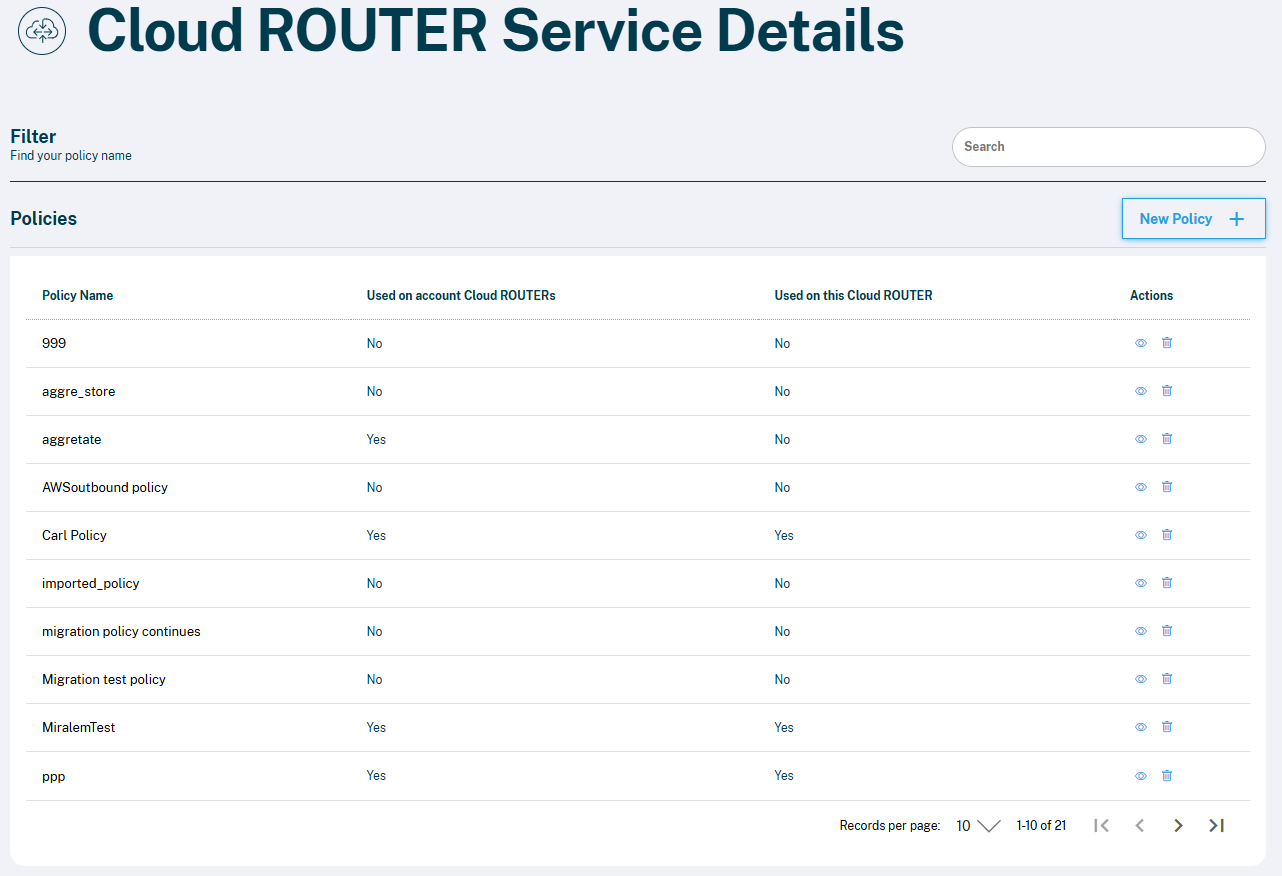
Overview
Clicking on Policies opens a full account-level overview of all Policies you have created. The table shows:
- Policy Name
- Used on account Cloud ROUTERs – whether the Policy is in use on any Cloud ROUTER in your account
- Used on this Cloud ROUTER – whether the Policy is active on the currently viewed Cloud ROUTER
Creating a New Policy
- Click New Policy in the top-right corner.
- Enter a descriptive Name for your Policy.
- Under Policy Entries, click Add Prefix List.
- Search for and select the desired Prefix List.
- Configure the routing behavior for each entry:
- Local Preference – sets the BGP Local Preference value for accepted routes
- AS Path Prepend – adds one or more copies of your AS number to the AS path
- Filter – choose Accept, Reject, or Continue
- Repeat to add more entries. Use the drag handle (☰) to reorder entries.
- Click Save to store the Policy.
⚠️ Saving a Policy does not activate it. You must separately attach it to a connection — see below
Importing From an Existing Policy
In the New Policy screen, click Import from Policy to duplicate entries from an existing Policy — useful for reusing configurations quickly.
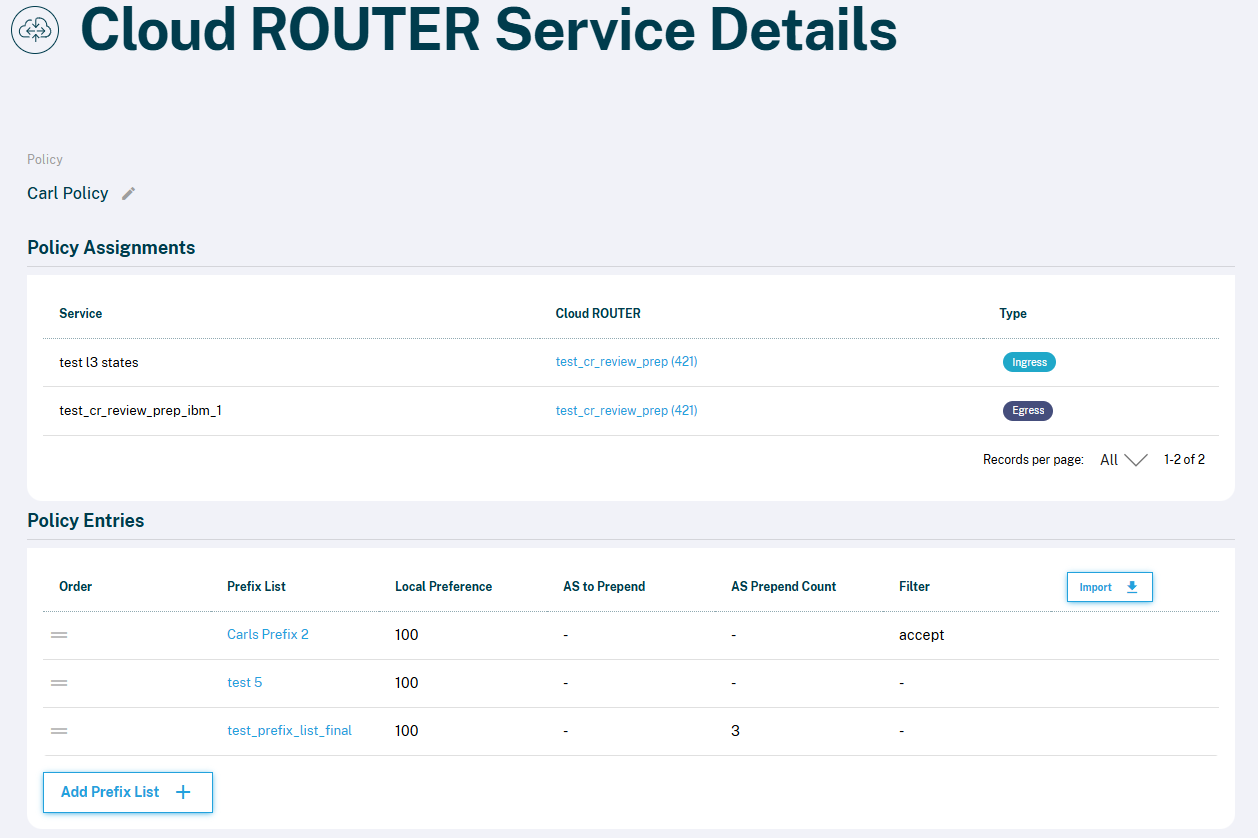
Viewing & Editing a Policy
Click the eye icon (👁) next to any Policy to open its detail view. Here you can:
- See all Policy Assignments (which connections use this Policy, and whether as Ingress or Egress)
- See and edit all Policy Entries (Prefix List, Local Preference, AS to Prepend, AS Prepend Count, Filter)
- Add or remove Prefix List entries
Deleting a Policy
Click the trash icon next to a Policy to delete it.
Note: A Policy can only be deleted if it is not currently in use on any Cloud ROUTER. If "Used on account Cloud ROUTERs" shows Yes, detach it from all connections first.
Attaching a Policy to a Connection
⚠️ This is the critical step. A Policy only becomes active on your Cloud ROUTER once it is attached to a specific connection as an Inbound (Ingress) or Outbound (Egress) Policy. Without this step, your routing is not affected.
Attaching a Policy works at the connection level, not from the Policies overview.
- Navigate to your Cloud ROUTER service and open the Overview with the relevant connection.
- Find the connection you want to apply the Policy to. Each connection shows its current Status and the assigned Policies (Inbound ↓ and Outbound ↑).
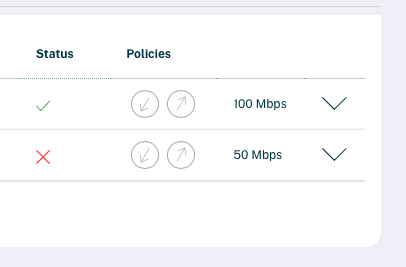
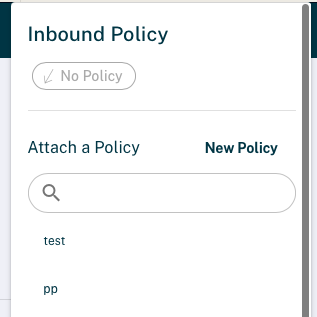
- Click the Inbound (↓) or Outbound (↑) Policy icon on the connection.
- A panel opens showing the currently assigned Policy (or No Policy if none is set).
- Under Attach a Policy, use the search field to find your Policy — or click New Policy to create one on the spot.
- Select the Policy from the list to attach it.
Tip: You can attach different Policies to Inbound and Outbound on the same connection — for example, to filter accepted prefixes on ingress and control advertisement on egress.
Summary Table
Feature | API Support | Portal Support |
Create | ✅ | ✅ |
Edit / Change | ✅ | ✅ |
Delete | ✅ | ✅ (if not in use) |
Attach / Detach to Connection | ✅ | ✅ |
List All | ✅ | ✅ |
API Documentation is here: https://api-docs.de-cix.net/#0a282fef-297f-4c4f-aba9-a7d4aa7ddf06